A comprehensive guide to channel integrations and their features
Integrate WhatsApp, Facebook, Instagram, and Telegram with Pepper Cloud CRM and explore various features of the Channel integrations.
Pepper Cloud CRM brings to you the power of a single communication channel through multi-channel integration. This allows you to integrate various communication channels such as WhatsApp and Facebook Messenger, with your CRM and allows you to consolidate all your sales communications into one single channel.
So, how exactly is Pepper Cloud CRM and Channel integration helps your business to grow?
Benefits of connecting messaging channels with Pepper Cloud CRM
The integration between communication channels (such as WhatsApp, Facebook, Instagram, and Telegram) and your CRM provides you with a single platform to communicate with your leads and customers. Along with it, it also empowers your business with various other benefits.
- Provides your entire team with a single platform to respond to conversations.
- Facilitates all your team members to use a single chat account to talk to customers.
- Allows you to conveniently send one-to-one private or bulk messages to your contacts.
- Empowers your team to reply instantly with customisable message templates.
- Enables team collaboration by assigning the conversations to the right team member.
- Offers you a holistic view of your potential customers and provides you with a conversation history.
- Captures and converts visitors into leads automatically.
- Suggests merging the contact details when your potential customer messages you from multiple messaging platforms.
WhatsApp + Pepper Cloud CRM
With over 2.2 billion active monthly users, WhatsApp has proved to be one of the very popular messaging apps. However, businesses that are looking to use WhatsApp to talk with their leads and customers, need to either use a WhatsApp Business app or WhatsApp API.
WhatsApp Business app is for small teams (1-2 sales staff) whose primary need is to communicate with the customers one-on-one.
WhatsApp API is designed for growing enterprises with a dedicated sales team. It would facilitate multiple users on multiple devices to respond to messages through one WhatsApp number. However, the WhatsApp API does not have an official app or an interface.
Learn the differences between WhatsApp Business account and WhatsApp Business API in this blog.
The integration between WhatsApp API and the CRM system can provide a robust interface.
WhatsApp API can be linked with CRM by two methods: 1. Through intermediary Business Solution Partners (BSPs); 2. Directly through Meta Facebook
1. Integrating WhatsApp Business API with Pepper Cloud CRM, through a BSP
Here is how you can implement WhatsApp Business API with Pepper Cloud CRM through BSPs such as Twilio.
Pre-requisites:
- Twilio WhatsApp Business API
- Pepper Cloud CRM
Here is a quick guide to connecting Pepper Cloud CRM with WhatsApp
- To integrate with WhatsApp, WhatsApp Business API is required. Purchase WhatsApp Business API through the WhatsApp partner, Twilio. Learn how to get Twilio WhatsApp API with this guide.
- After purchasing Twilio WhatsApp Business API, login to your CRM system and navigate to “Channels”.
- Click on the “Create New” channel and choose “WhatsApp”.
- Connect your WhatsApp Business API by adding Account SID, Auth Token, and Twilio registered WhatsApp number into your CRM. You can access this information through your Twilio account dashboard.
- Copy and paste “Message Comes in URL” and “Call back URL” into your Twilio.
- Complete the set-up in your CRM.
Here is a step-by-step detailed guide on how to integrate WhatsApp Business API with Pepper Cloud CRM, refer to our guide.
2. Direct integration between WhatsApp and Pepper Cloud CRM through Cloud API
There are 3 major steps in the integration process of WhatsApp Business and Pepper Cloud CRM. Here are the prerequisites and the steps:
Pre-requisites
- Admin credentials of Pepper Cloud CRM
- Facebook App and Facebook Business Account
- A phone number that can receive voice calls or SMS
A quick guide to connect WhatsApp Cloud API with Pepper Cloud CRM
- Get WhatsApp Cloud API through your Facebook developer account
- Generate permanent access token
- Use the access token to integrate WhatsApp Cloud API with Pepper Cloud CRM
After successful integration, you can send and receive messages right from your CRM.
3. WhatsApp Web integration with Pepper Cloud CRM
WhatsApp Web in Pepper Cloud CRM allows you to access your WhatsApp Business App messages right from your CRM and respond to those messages.
Pre-requisites
- Phone with WhatsApp account (Business app or personal account)
- Pepper Cloud CRM
A quick guide to connecting WhatsApp Business App with Pepper Cloud CRM through WhatsApp Web
- Create a WhatsApp Web channel within Pepper Cloud CRM.
- Scan the QR code from your WhatsApp application on your mobile device.
- Start conversing with your customers.
Read Business advantages of integrating WhatsApp Web in CRM blog for a step-by-step process to integrate WhatsApp Web with Pepper Cloud CRM.
Facebook Messenger + Pepper Cloud CRM
Facebook is one of the essential customer touchpoints for modern businesses. With fast and personalised messages, you can easily win over your prospects, nurture your leads, and manage your sales pipeline. The integration between Facebook Messenger and Pepper Cloud CRM can help you create and chat with your Facebook leads right from your CRM.
Pre-requisites:
- Facebook page
- CRM account
Here is a step-by-step guide to connecting Pepper Cloud CRM with Facebook messenger.
- Navigate to “Channels” after logging in to your CRM.
- Click on the “Create New” channel and choose “Facebook”.
- Connect with Facebook by signing in to your Facebook account
- Choose the Facebook page.
- Complete the set-up in your CRM.
Here is a detailed guide on how to integrate your Facebook messenger with your CRM.
After completion, any message sent to your Facebook messenger will be received in the message module of your CRM.
Instagram + Pepper Cloud CRM
Instagram business account has unlocked various features for businesses to grow globally. Right from creating and promoting your brand to talking to leads and boosting your sales growth, Instagram can play a major role. Here is how you can integrate Instagram with Pepper Cloud CRM.
Pre-requisites
- Instagram business account
- CRM account with admin permissions
Steps to integrate Instagram with CRM
There are two major steps in integrating Instagram and CRM.
1. Preparing your Instagram account for the integration. There are 3 sub-steps in this step.
- Switch your Instagram personal account to a business account.
- Allow access to messages.
- Connect your Instagram account with your Facebook page.
You can find details of each of the above steps in our blog, A guide to creating an Instagram Business Account.
2. Integrating Instagram business account with Pepper Cloud CRM. You can read our blog, “How to integrate Instagram with Pepper Cloud CRM?” to learn the step-by-step process.
Read our blog to learn how Instagram CRM integration can help you in your business growth.
Telegram + Pepper Cloud CRM
Telegram, one of the popular messaging platforms is known for its speed and security. Telegram offers multiple features, including customisable bots for your business, that can empower your team to improve sales productivity. Here is how you can integrate Telegram with Pepper Cloud CRM.
Pre-requisites
- Telegram business account
- CRM account with admin permissions
Steps to connect Telegram business account with Pepper Cloud CRM
There are two major steps in the Telegram and CRM integration process.
1. Setting up your business account in Telegram: This can be done with the help of the BotFather in Telegram.
2. Configure the Telegram channel in Pepper Cloud CRM.
Get detailed information on the above steps in our step-by-step guide to integrate Instagram with Pepper Cloud CRM.
Read our detailed guide to know how to maximize your business potential with Telegram and CRM integration.
Quick ways to get you started with Channel integration
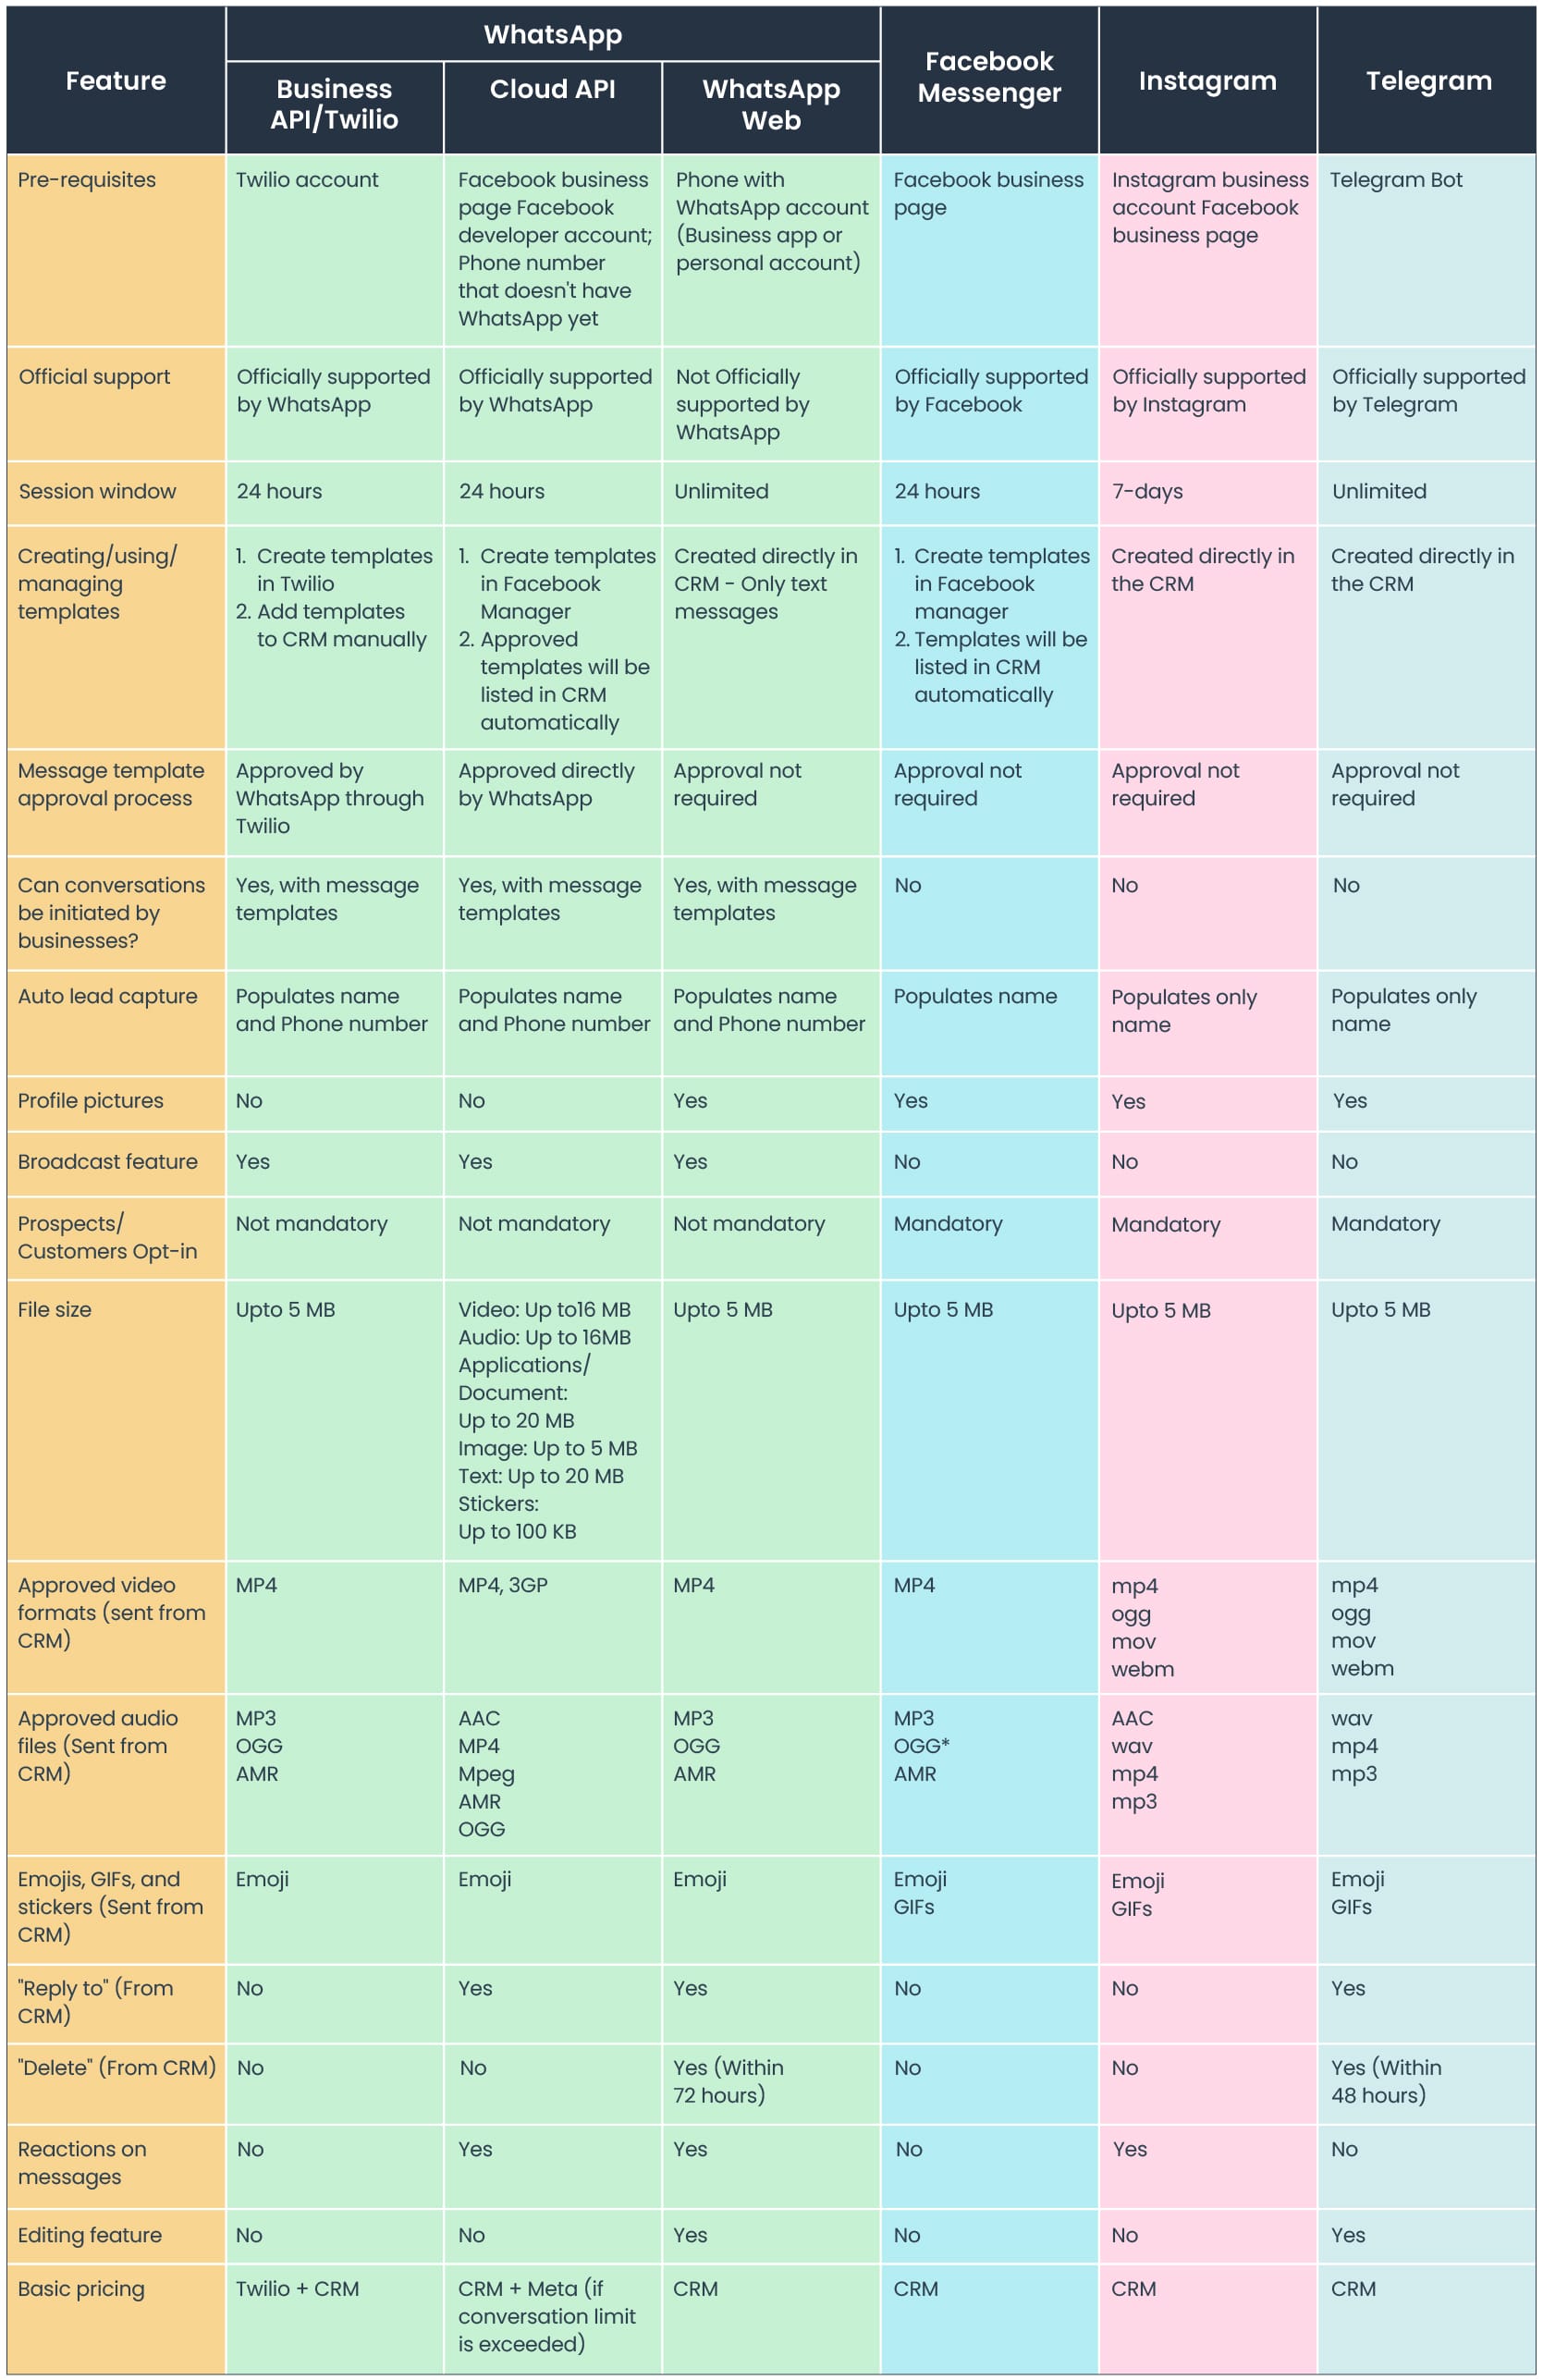
Before we start with the tips and tricks, here is a comprehensive view of various channels and how they behave when integrated with CRM.
Message Module
The user will be able to send messages only after the CRM and Channel integration.
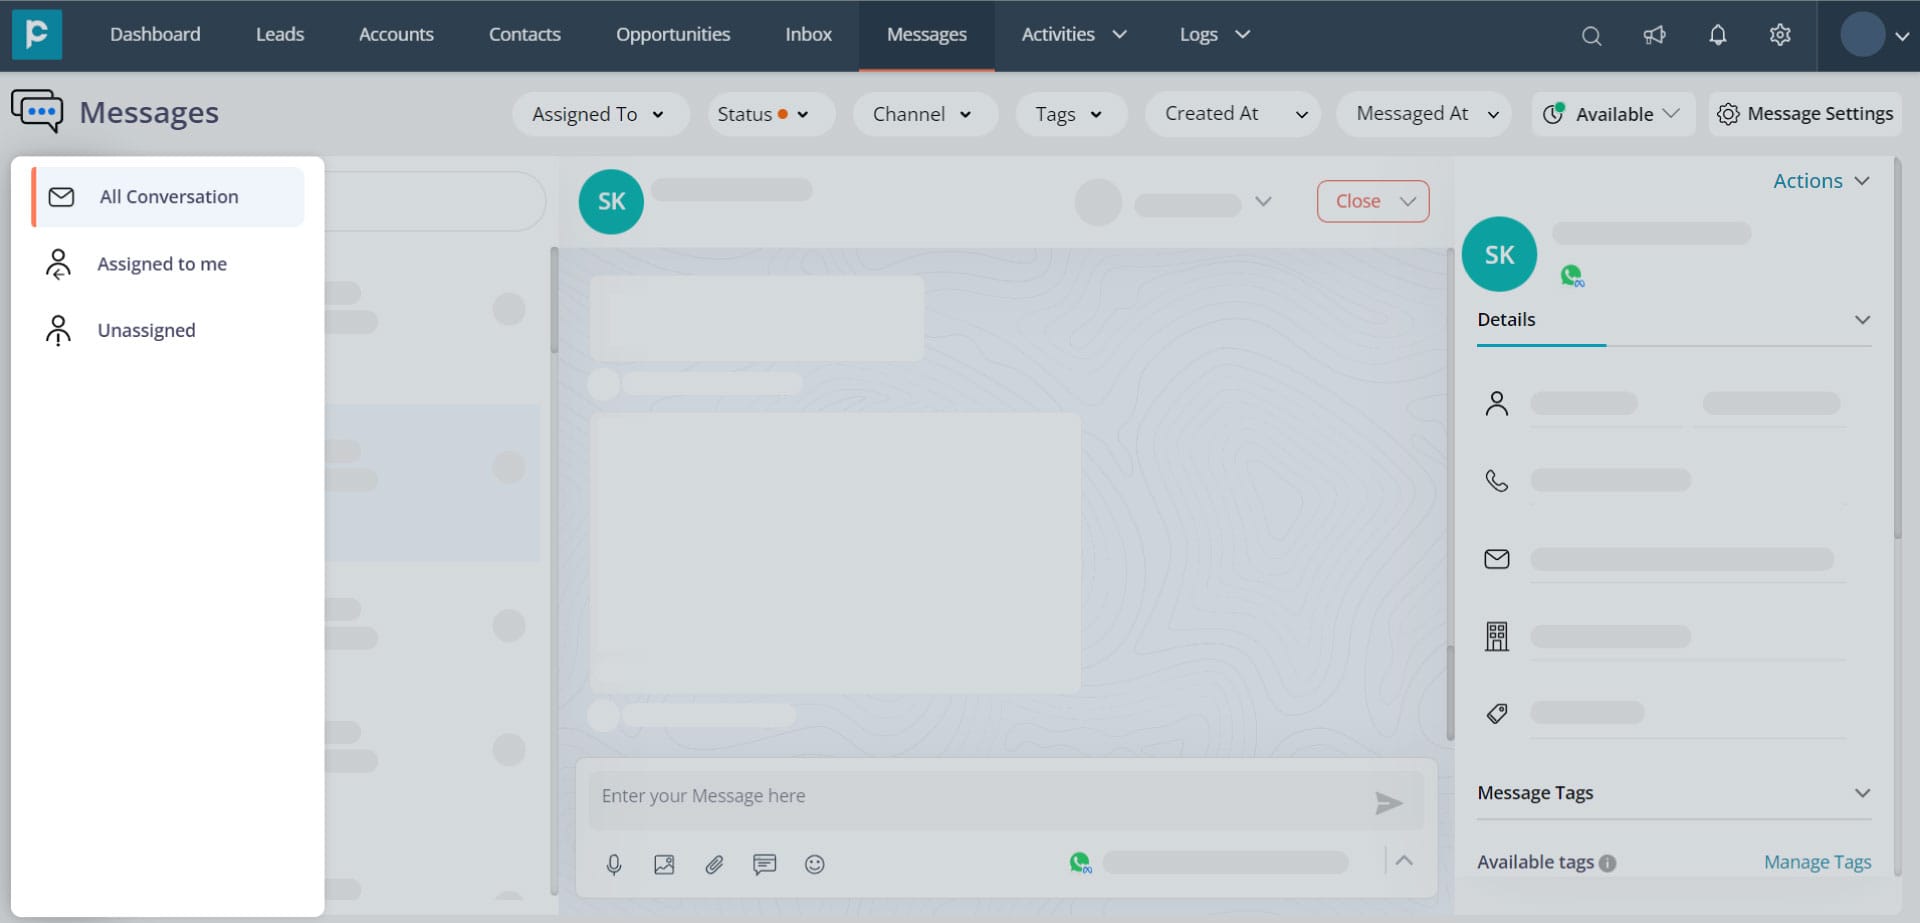
The messages section has 3 sections:
- Unassigned messages: All new messages are unassigned messages and will be available in the “New Messages” screen.
- Assigned to me: Upon replying to a message, the conversation is assigned to the messaging team member. Alternatively, the message can be manually assigned to the team member.
- All conversations: It will collectively have assigned and unassigned messages.
- Archive conversations: All the conversations that are being archived will be shown in this tab.
Channel access permission
Keeping your messaging channels secure is crucial, especially when dealing with teams that have varying roles, responsibilities, and locations. Whether it's a sales team, marketing team, support team, or a team based in a particular region, you need to ensure that sensitive information is accessed only by authorised individuals.
With the channel access permission feature, you can make a channel “Private” and restrict access to the team members. Only members added to the channel by the admin can view and respond to messages in the private channel. Here are a few points to be considered for private channels.
- A team member can be added to a private channel only if their profile is “enabled” for the messaging module.
- Only admins can create a private channel and add users to the channels.
- All the admins will be added to the private channels by default.
- The conversations received to the private channel can be assigned only to a member of the private channel.
- If you have not enabled privacy for the channel, the channel will be public and can be accessed by all your team members.
- You can also edit the permissions for the channels and make your channel public anytime.
To make a channel private, simply toggle on the "Private" option when creating a new channel. If you already have an existing channel that you want to make private, you can easily do so by editing the channel settings.
Message templates
Message templates are formats that can be used over and over to message your prospects, leads, or customers. Message templates can be used in multiple scenarios such as:
- To initiate a conversation with the prospects.
- To market your products and services through promotional message templates.
- To chat with your customers beyond the session window.
- To provide updates and share reminders with the customers.
- To send quick and instant replies to queries
Note:
- You can send message templates in WhatsApp only after approval. But on Facebook, Instagram, and Telegram, you don’t need pre-approval.
Read our blogs to know more about types of message templates and examples and how to create message templates.
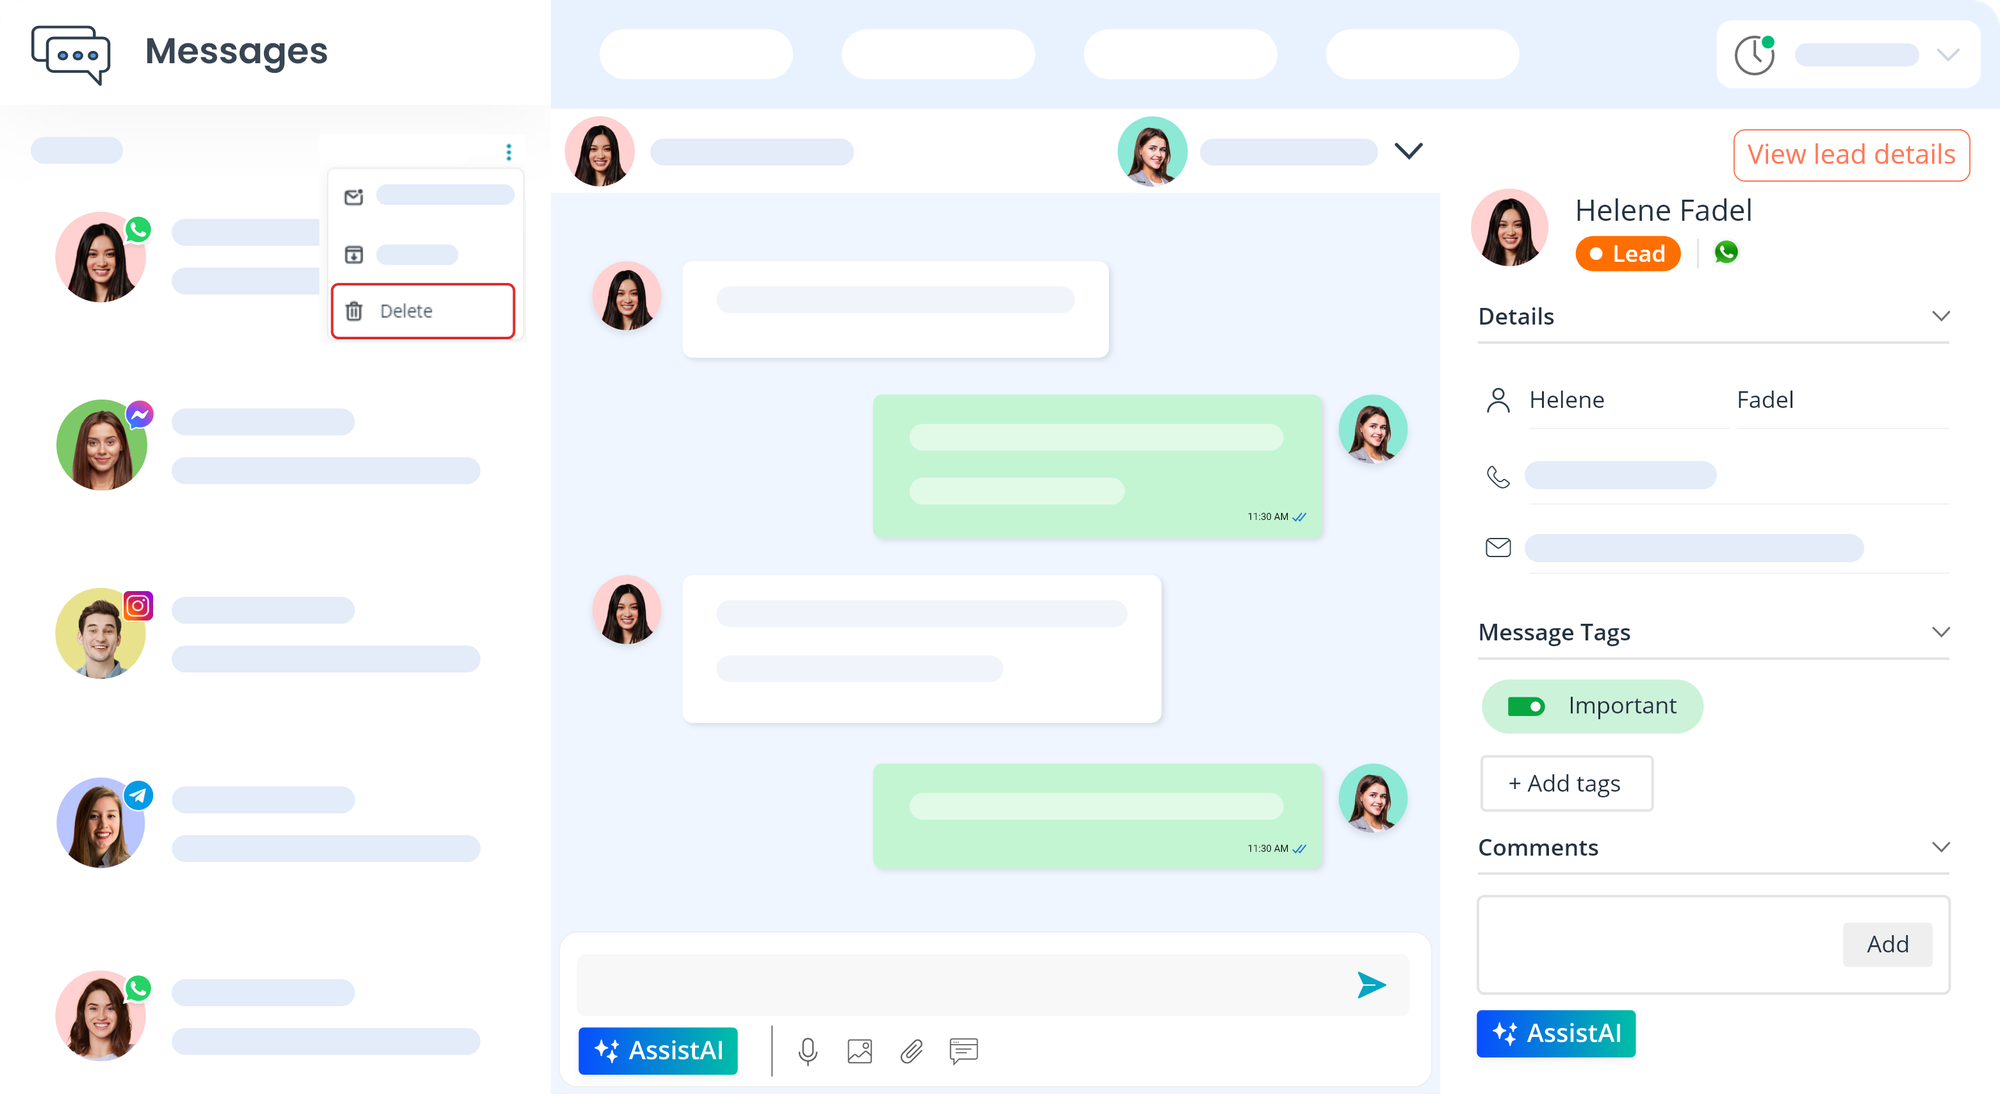
“Delete” feature
Delete messages
In the message module, you have the ability to delete the messages that you have sent to customers. This feature can be helpful in situations where a message was sent in error, or where the message contains sensitive or confidential information. You can only delete your own message.
Note: You won’t be able to delete any messages:
- If the channel has been deleted,
- The chat is not assigned to you, or,
- The chat has expired.
To use this feature, click the down arrow on the message and click “Delete”. You will be prompted to confirm.
Delete conversations
The CRM brings enhanced inbox management capabilities. Admins are now allowed to efficiently clean up the message module by deleting entire conversations. This feature ensures a clutter-free and organised inbox for smoother communication.
You can monitor your deleted activity in "Activity Stream" so that your teammates can see if any admin has deleted any conversation on which they were working.
Note:
- You can delete the conversation in the CRM, it won’t be deleted from the mobile. Whatever conversations have been deleted won't reflect on the phone.
- Telegram and WhatsApp Web groups cannot be deleted from the CRM.
Bulk delete action
Note:
- Only the admin can perform the bulk delete action.
- You can delete up to 20 conversations.
To perform this bulk delete action, follow the steps:
1. Click on the three dots on the left side of the message listing panel.
2. Click “Select conversations”.
3. Choose the conversations you would like to delete.
4. Click on the three dots again and click “Delete”.
“Reply to” feature
The “reply to” feature on the message enables users to respond to specific messages within a conversation thread, making it easier to track and manage customer interactions. With the "Reply to" feature, customer service representatives can quickly identify and address specific customer concerns, reducing response times and improving customer satisfaction. Additionally, this feature allows for more organised and efficient communication between businesses and their customers, helping to build stronger and more loyal customer relationships.
Note: You won’t be able to reply to any messages if:
- The channel has been deleted,
- The chat is not assigned to you, or,
- The chat has expired.
To use this feature, click the down arrow on the message and click “Reply”. You will be prompted to confirm.
Edit sent messages
This feature enables you to correct a typo, update information, or refine your messages after being sent. Currently, this feature is available in WhatsApp Web and Telegram channels only. In the WhatsApp Web channel, you can edit the message within 20 minutes of sending it. In the Telegram channel, you can edit the message within 48 hours of sending it.
To edit a message, follow these steps:
- Click on the downward arrow on the sent message.
- Click the "Edit" option.
You can easily edit and update your sent message.
Note: Messages can only be edited on the device from which they were originally sent. For instance, if a message is sent from a mobile device, it cannot be edited from a desktop or CRM platform.
Adding reactions to the message
This feature allows you to add a quick and easy response to a message by using an emoticon or other reaction, such as a thumbs up or a heart. The feature can be particularly helpful as it allows customer service representatives to acknowledge and respond to customer messages quickly and efficiently, while also providing a more personalised and engaging experience.
Note: You won’t be able to react to any messages:
- If the channel has been deleted,
- The chat is not assigned to you, or,
- The chat has expired.
Sending attachments
In the message module, you can now effortlessly upload or simply drag and drop files, including images (jpeg, jpg, png, bmp, tiff), audio (mp3, mpeg, ogg), videos (mp4), and PDF documents. Plus, the uploadable file size limit has been increased considerably for:
- WhatsApp API/ Twilio: Attachments of up to 5 MB can be sent.
- WhatsApp Cloud API: Audio files up to 16 MB, text up to 20 MB, applications/documents up to 20 MB, images up to 5 MB, videos up to 16 MB, and stickers up to 100 KB can be sent.
- WhatsApp Web: Attachments of up to 5 MB can be sent.
- Facebook Messenger: Attachments of up to 5 MB can be sent.
- Instagram: Attachments of up to 5 MB can be sent.
- Telegram: Attachments of up to 5 MB can be sent.
Archive conversations
You can archive the conversations which are not relevant to you for the time being. This feature is available for all users. You can personalise it based on your preference to keep the chats archived in the tab when a new message comes in.
Note: To use this feature you must have the Message module access.
1. In message module, click the downward arrow on the message you would like to archive.
2. Click “Archive”.
3. The message will automatically move to “Archived
Bulk archive action
Note:
- Users with access to the message module and channels can perform the bulk archive action.
- You can archive up to 20 conversations at once.
To perform this bulk archive action, follow the steps:
1. Click on the three dots on the left side of the message listing panel.
2. Click “Select conversations”.
3. Choose the conversations you would like to archive.
4. Click on the three dots again and click “Archive”.

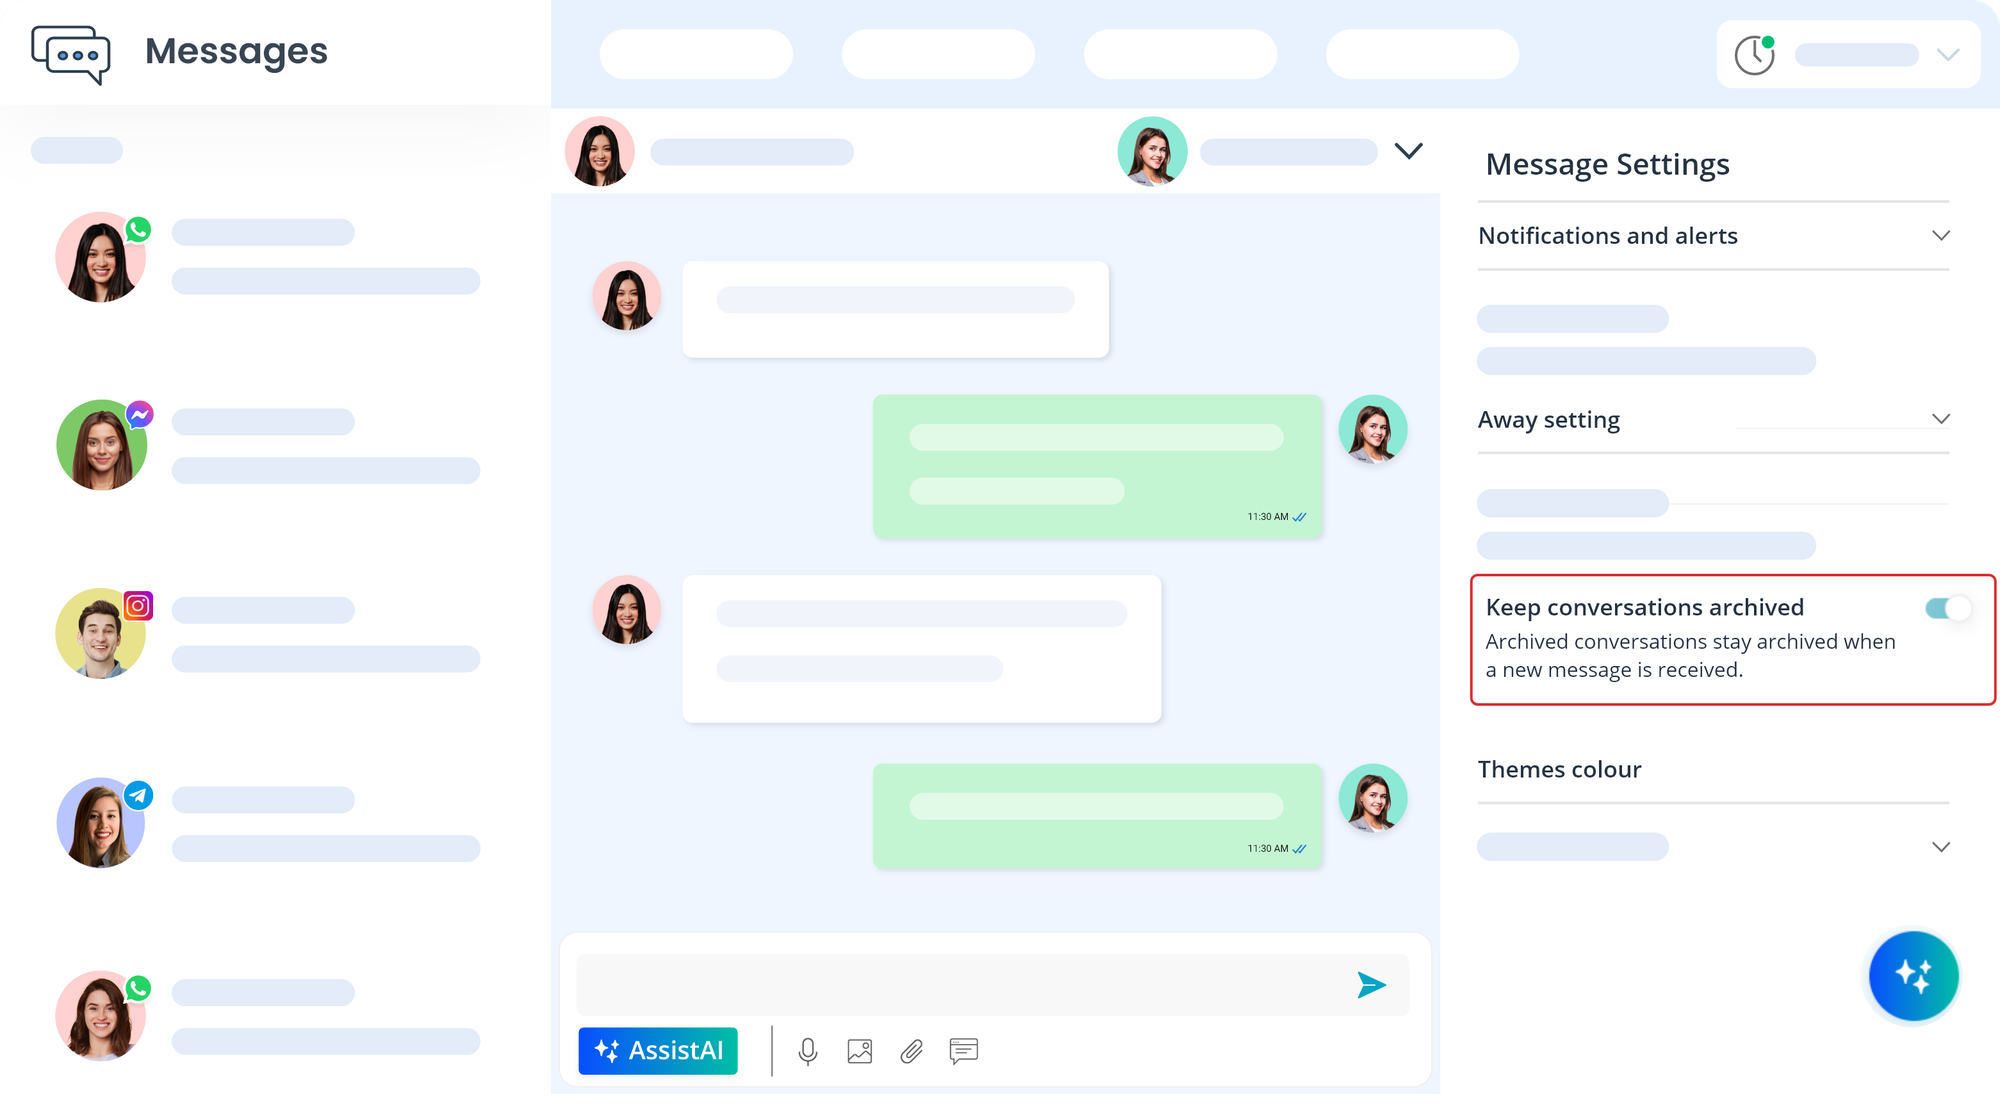
Archive settings
The archived conversations will remain archived when new messages are received. To change this setting, you need to go to message settings. Here is how to navigate.
1. Click on the settings icon (gear icon) in the message module.
2. Message settings, switch the toggle on/off. If the toggle is on, the conversations will stay archived when a new message is received. If the toggle is off, the conversations will
Create tasks from messages, comments, or closing notes
Whether it's assigning follow-up actions, delegating responsibilities, or setting deadlines, you can easily do all those right from the message module. Here are the steps to create tasks within the message module.
Note:
- The user must have access to the message module and activity module.
Create tasks from messages
1. Navigate to the message in the conversation.
2. Click the down arrow of the message.
3. Click “Create task”

4. Fill in the required details in the task modal and save it.
The task will be automatically saved.
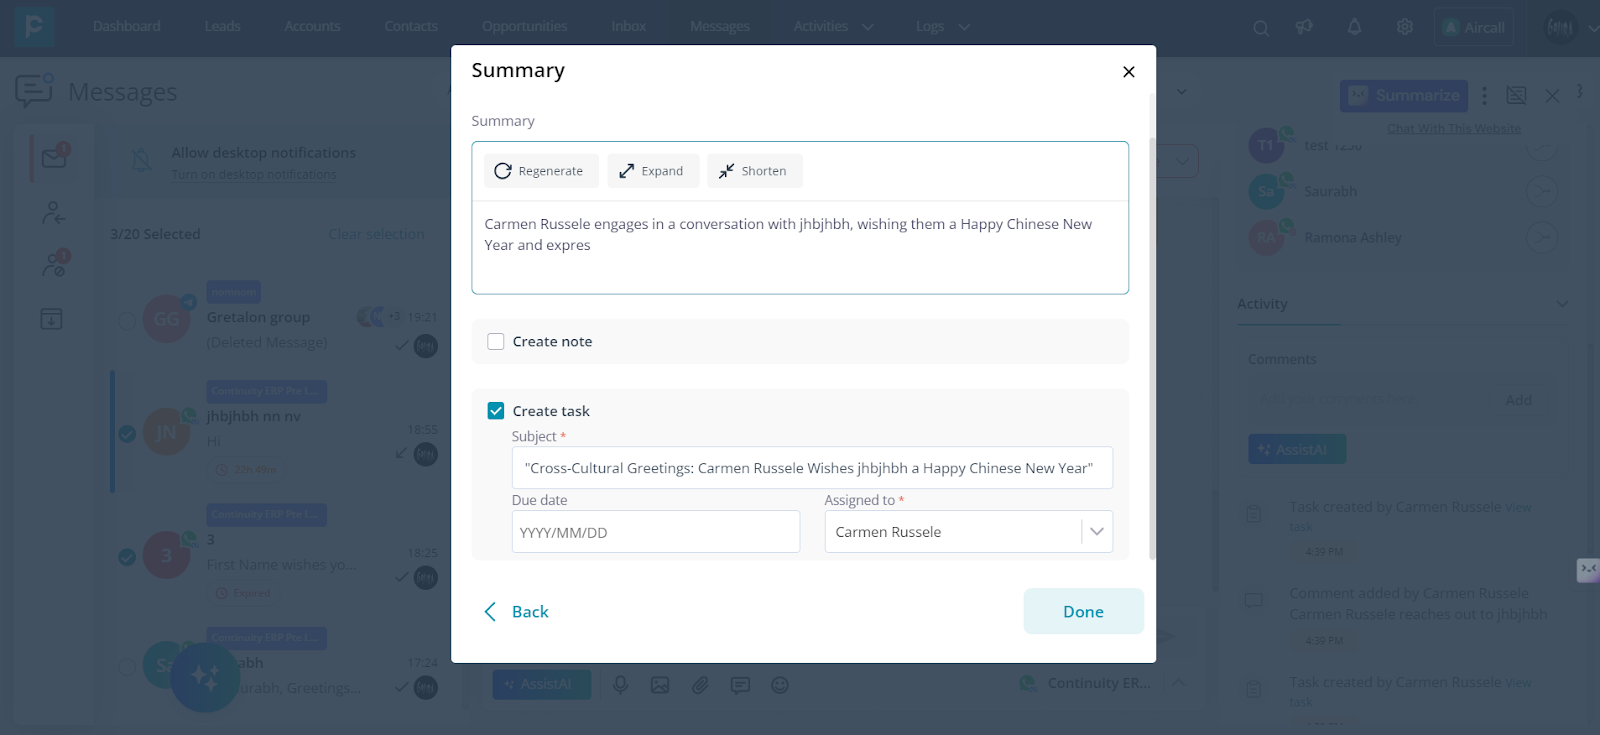
Create tasks from comments
1. Navigate to the conversations within the message module.
2. On the right panel, you can see the details. Scroll down to the “Comments” section.
3. Click AssistAI.
4. Choose “summary” and fill in the task details.
5. Click “Done”
The task will be automatically saved.
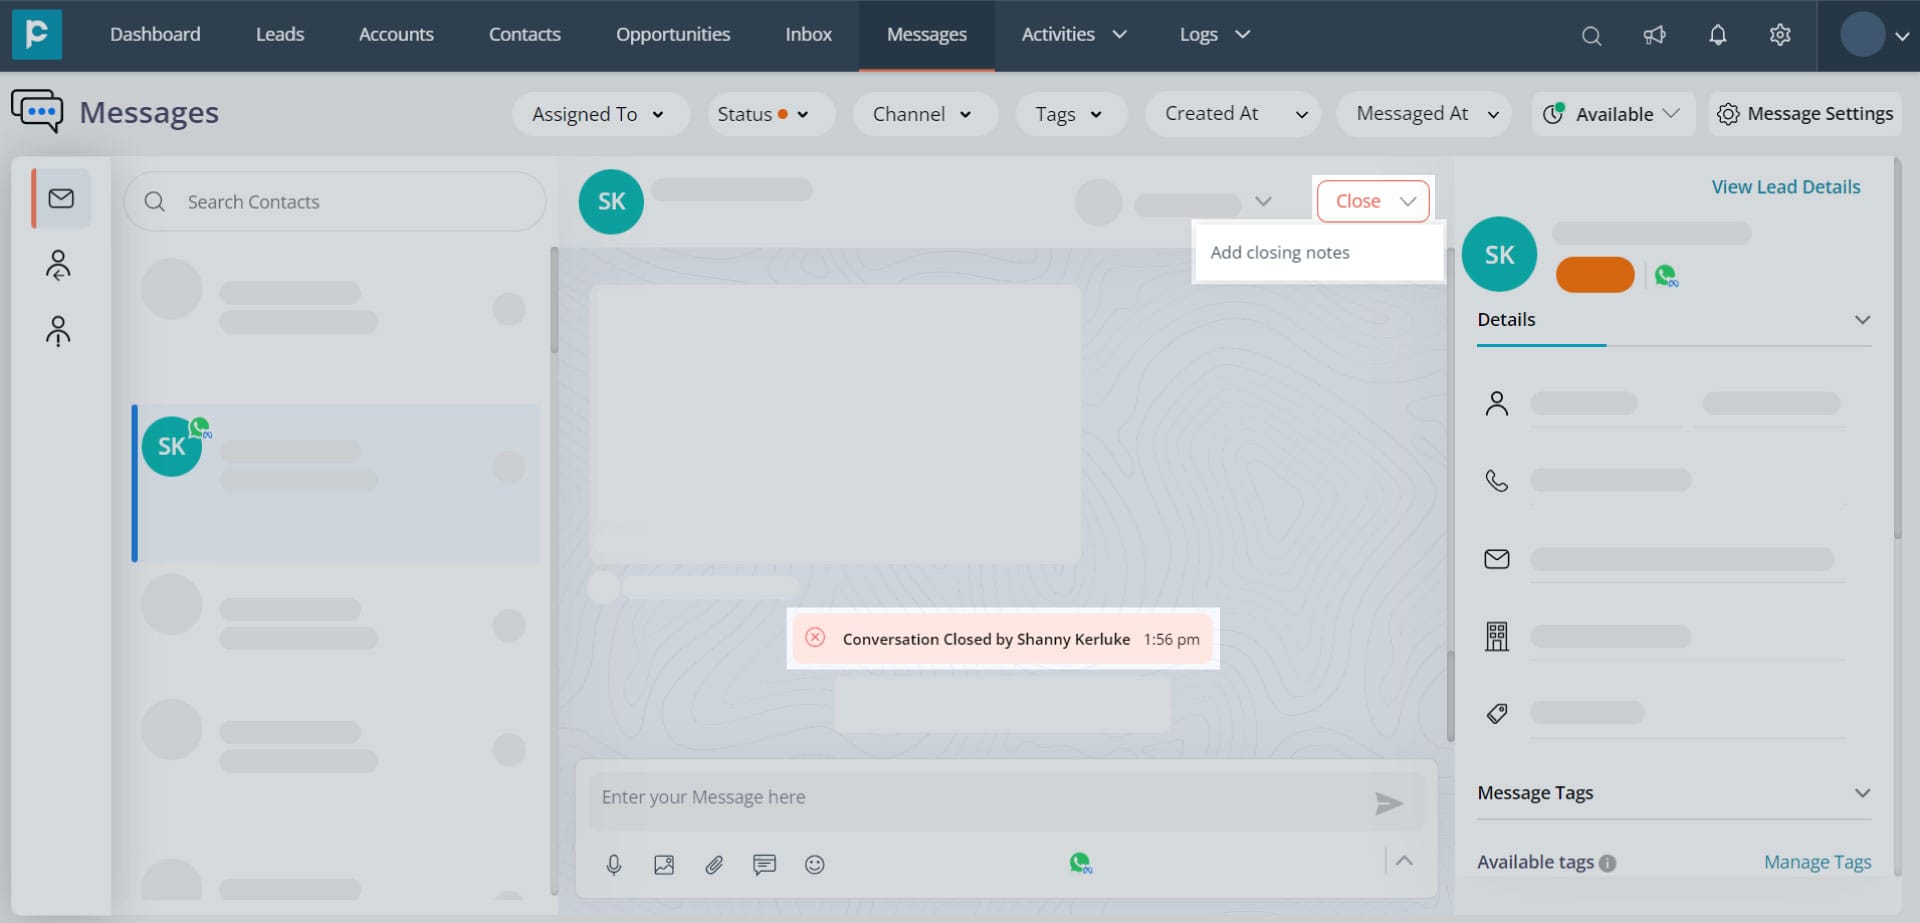
Create tasks from closing notes
1. Navigate to the conversations within the message module.
2. On top of the conversation, click the down arrow next to the “Close” button.
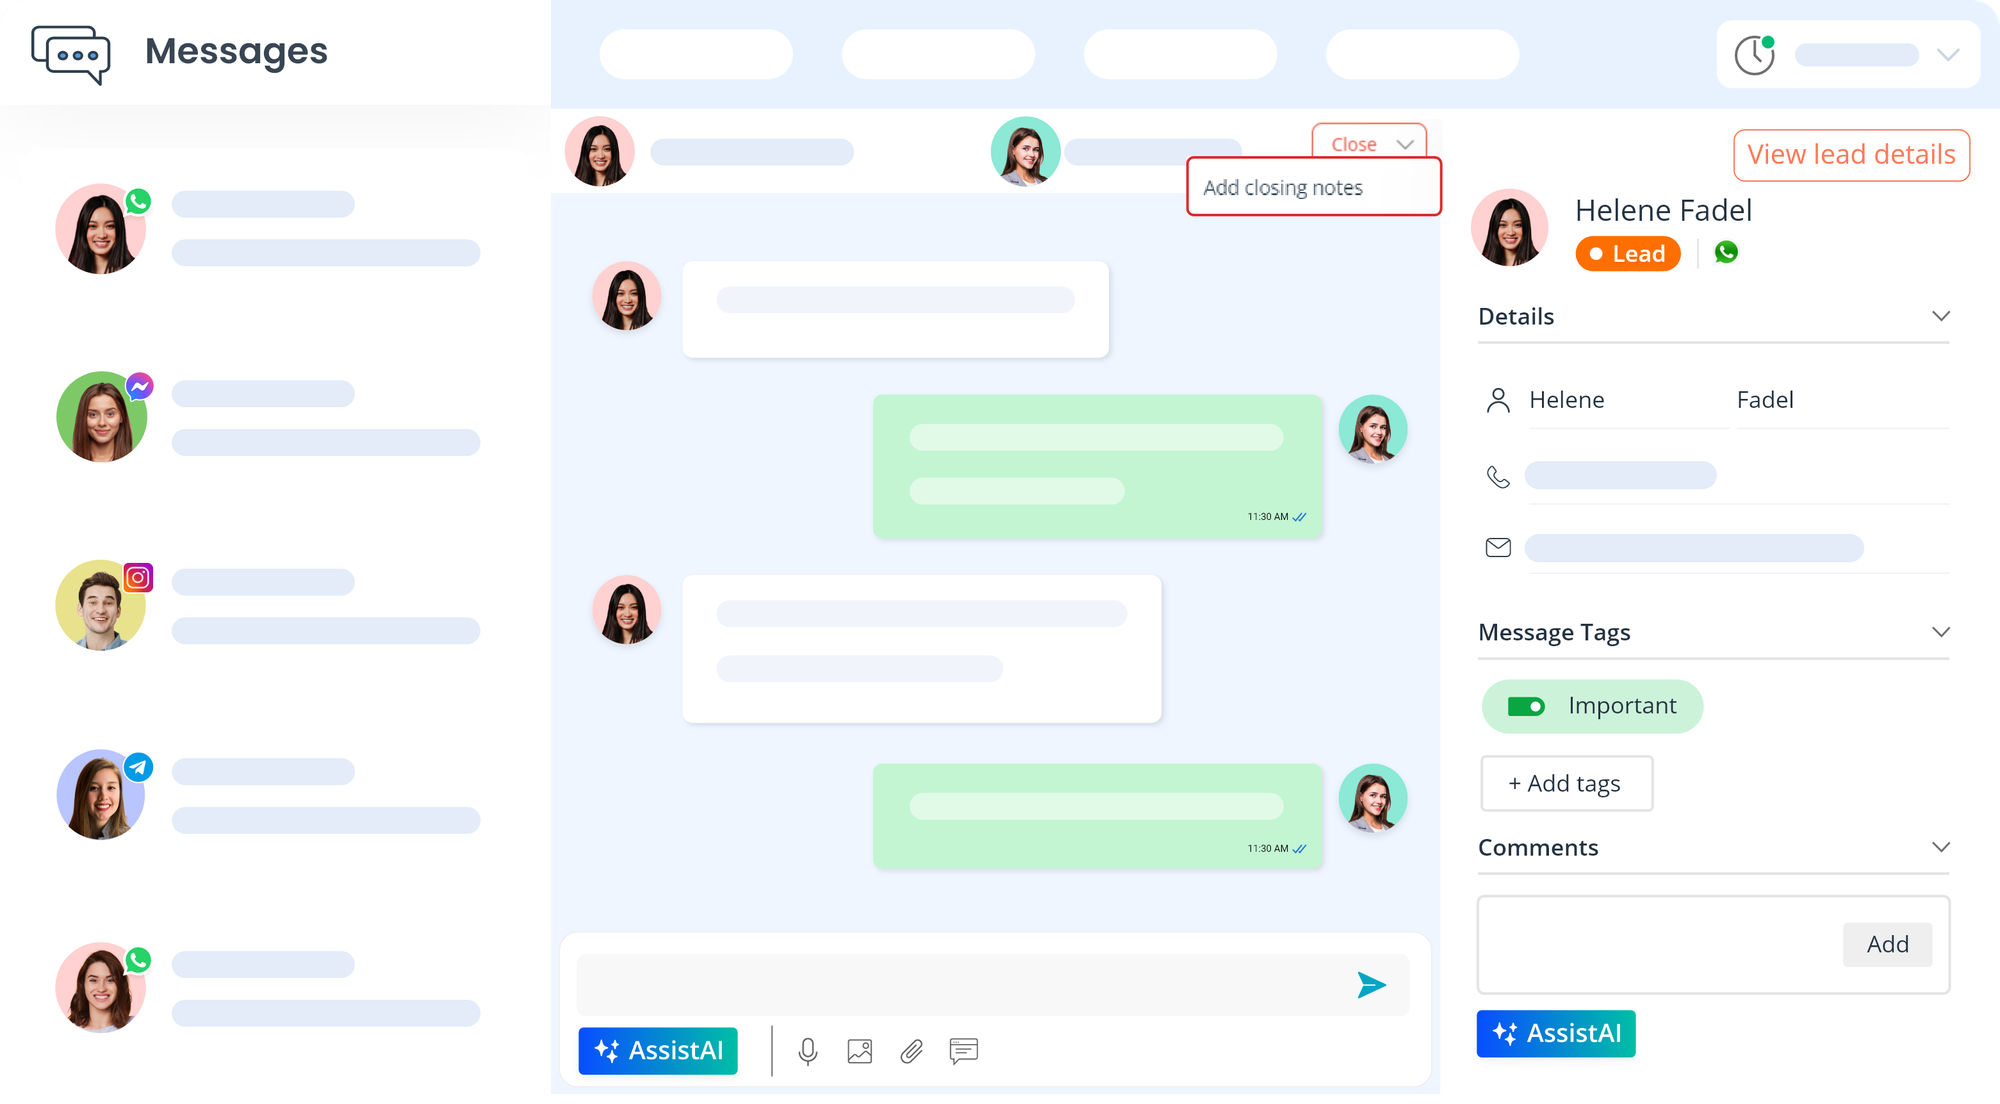
3. Click “Add closing note”
4. Click “AssistAI”
5. Choose “summary” and fill in the task details.
6. Click “Done”
The task will be automatically created.
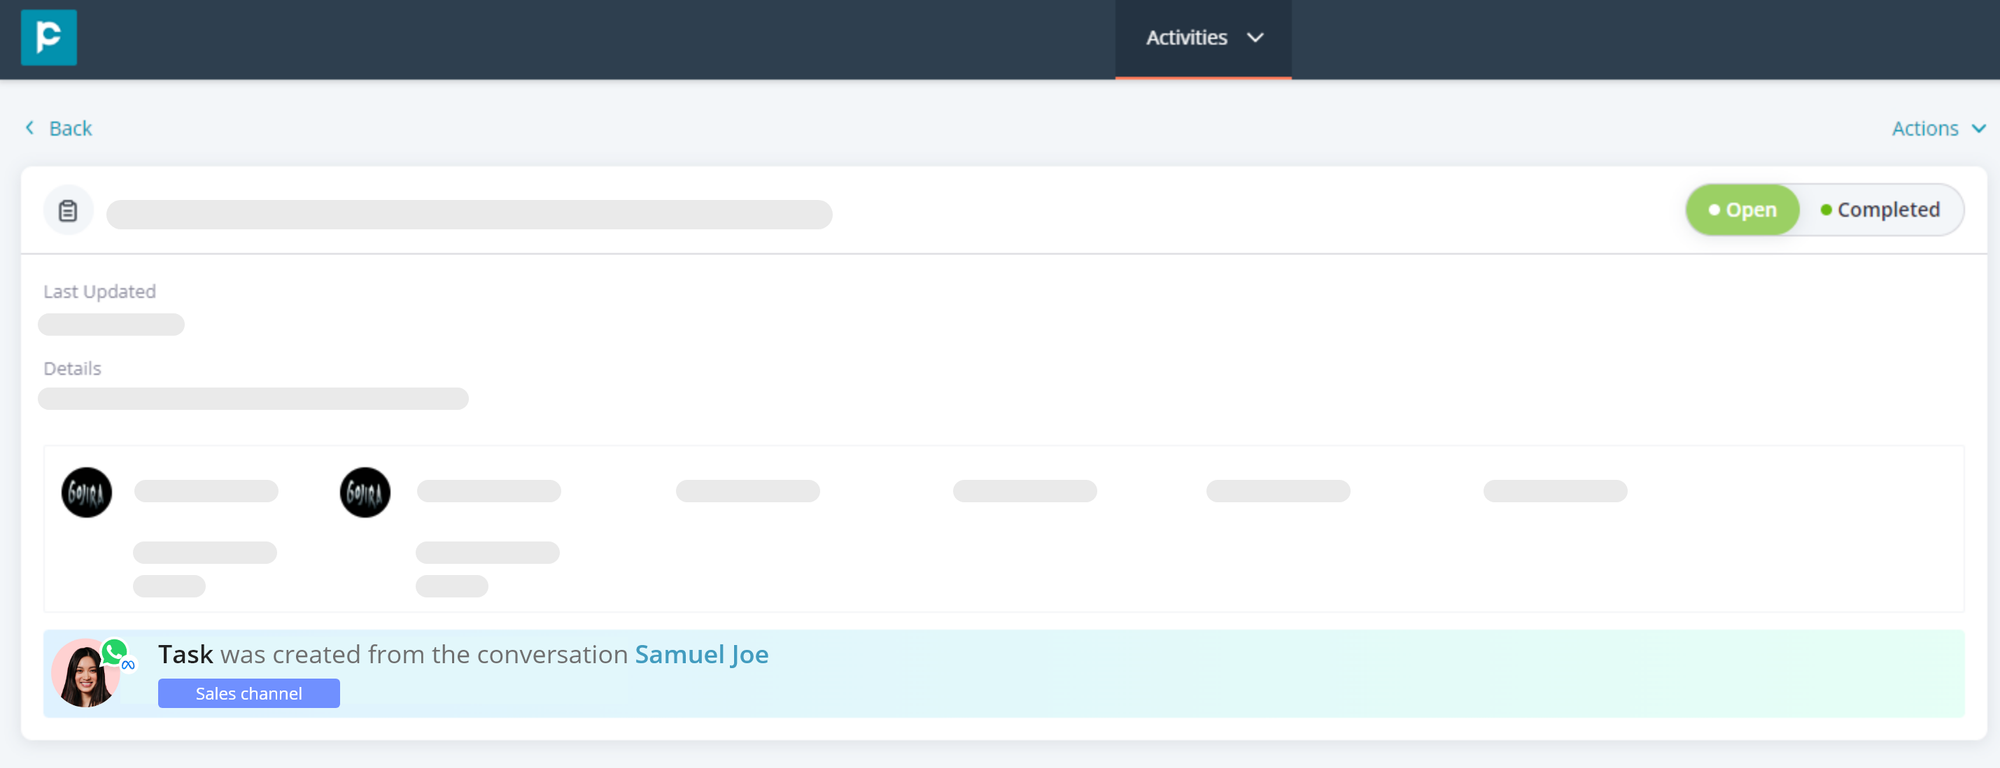
Note:
- The notifications of creating the task will be shown in the activity logs and on the conversation panel of the message module.
- In the task details page, you can access the details of the conversation on which the task was created.
Search conversations
You don’t have to inconveniently scroll through endless messages anymore to find the file or message you are looking for. With the intuitive search bar in the CRM’s Message module, you can effortlessly search for conversations using the various options mentioned below.
- Documents: Documents that are sent and received across all the conversations.
- Images: All the images sent to or received from conversations.
- Videos: All the videos were sent and received across all the conversations.
- Audios: All the audio files which are sent or received across all the conversations.
Note:
- You can only select one of the above-mentioned options at a time. Once the option is selected, you cannot select any other option. For example, documents and images cannot be searched simultaneously.
- The header filter will only be applicable to the conversations.
Broadcast
Note:
- Available for the leads, contacts, and opportunities with mobile numbers.
- You can broadcast messages only through the WhatsApp channel.
- You can broadcast pre-approved message templates only.
Users can send messages from the CRM to individual numbers by accessing the icon or can also send the same message to multiple users through the broadcast message feature.
1. Navigate to the "Leads" or "Contacts" or "Opportunities" module.
2. Select the Contacts/Leads/Opportunities to whom you want to broadcast messages.
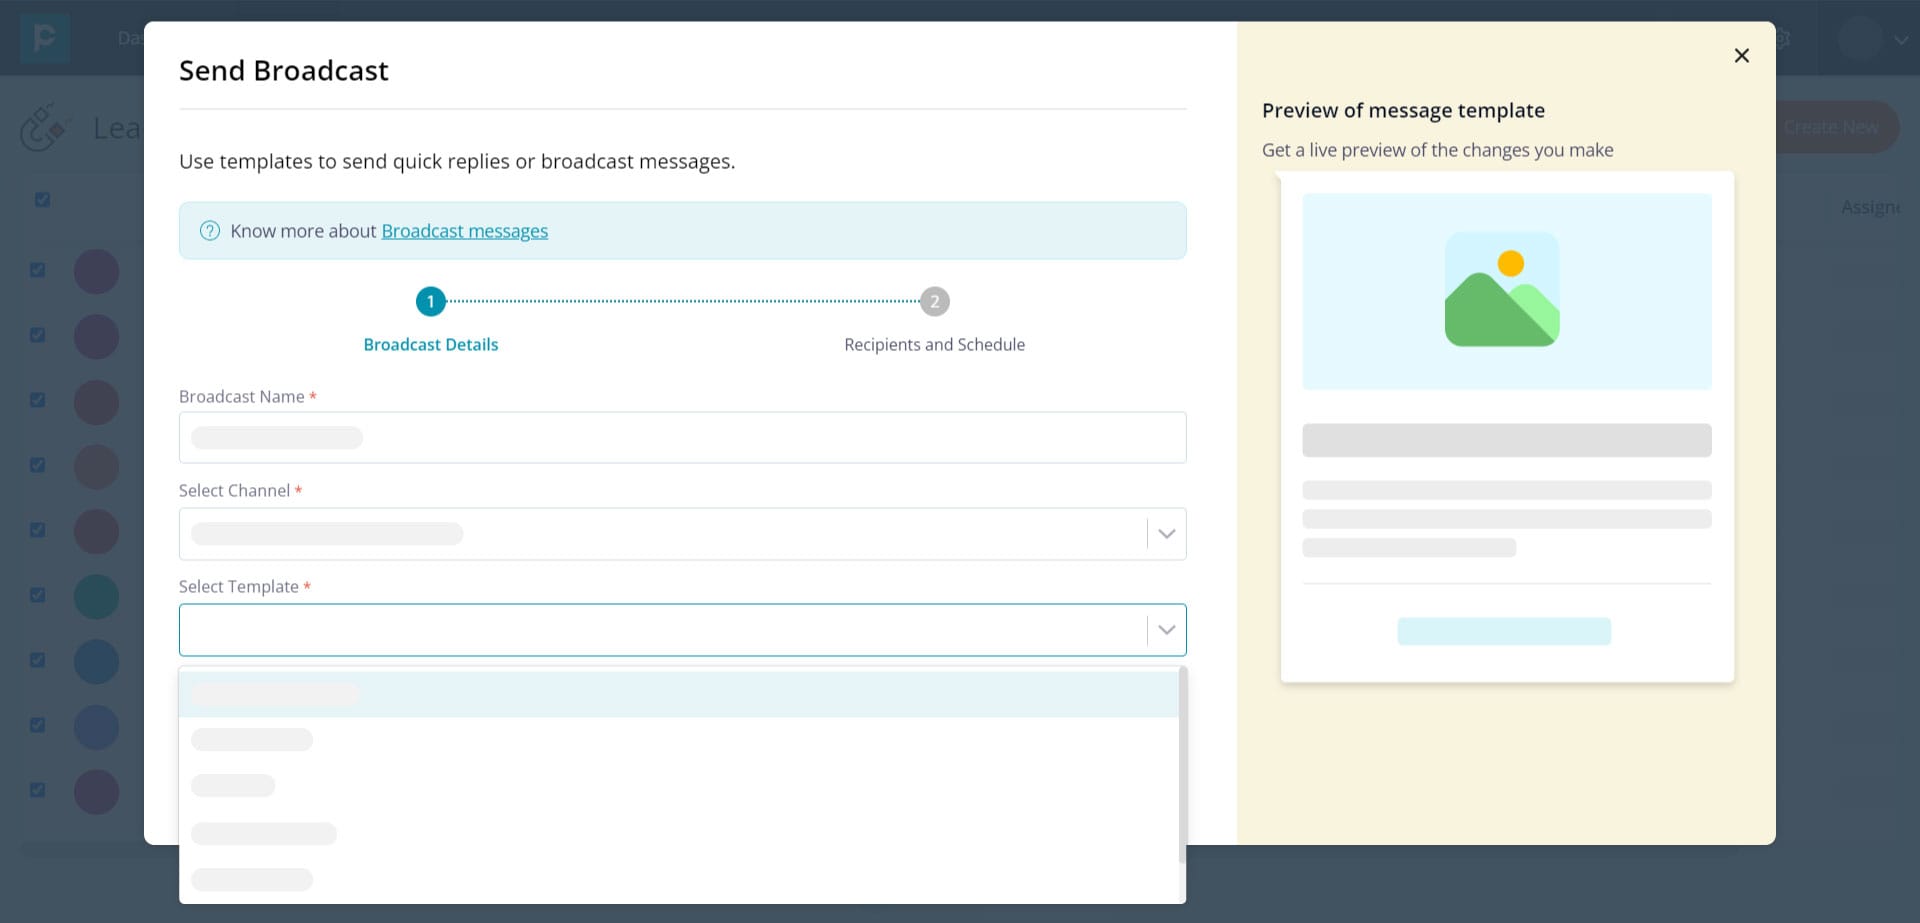
3. Click on “Actions” and choose “Send Broadcast”
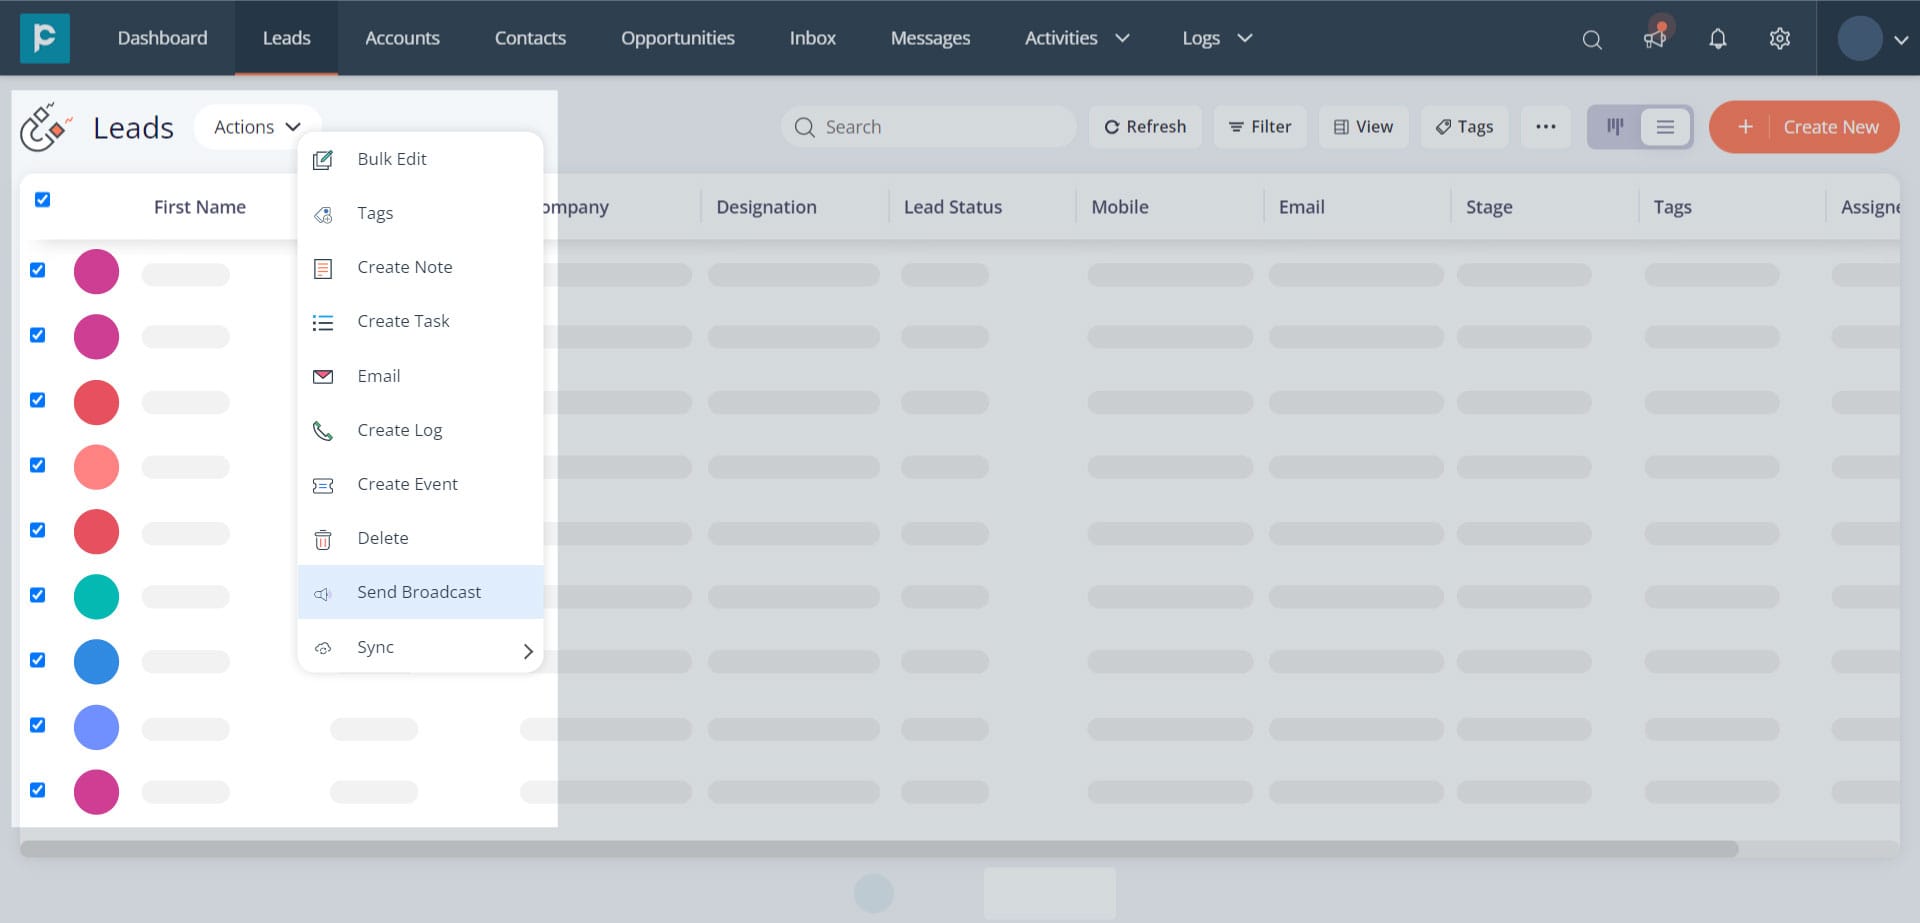
4. In the “Send Broadcast” modal, enter the broadcast details such as Broadcast name, Channel, and Template. You can see the live preview of your template as well. Click “Next”.
Note: When channels are chosen, the user can only select Templates added to the particular channel in the dropdown. Following this dynamic fields will be rendered for the user to select either a system field or a custom field of the CRM.
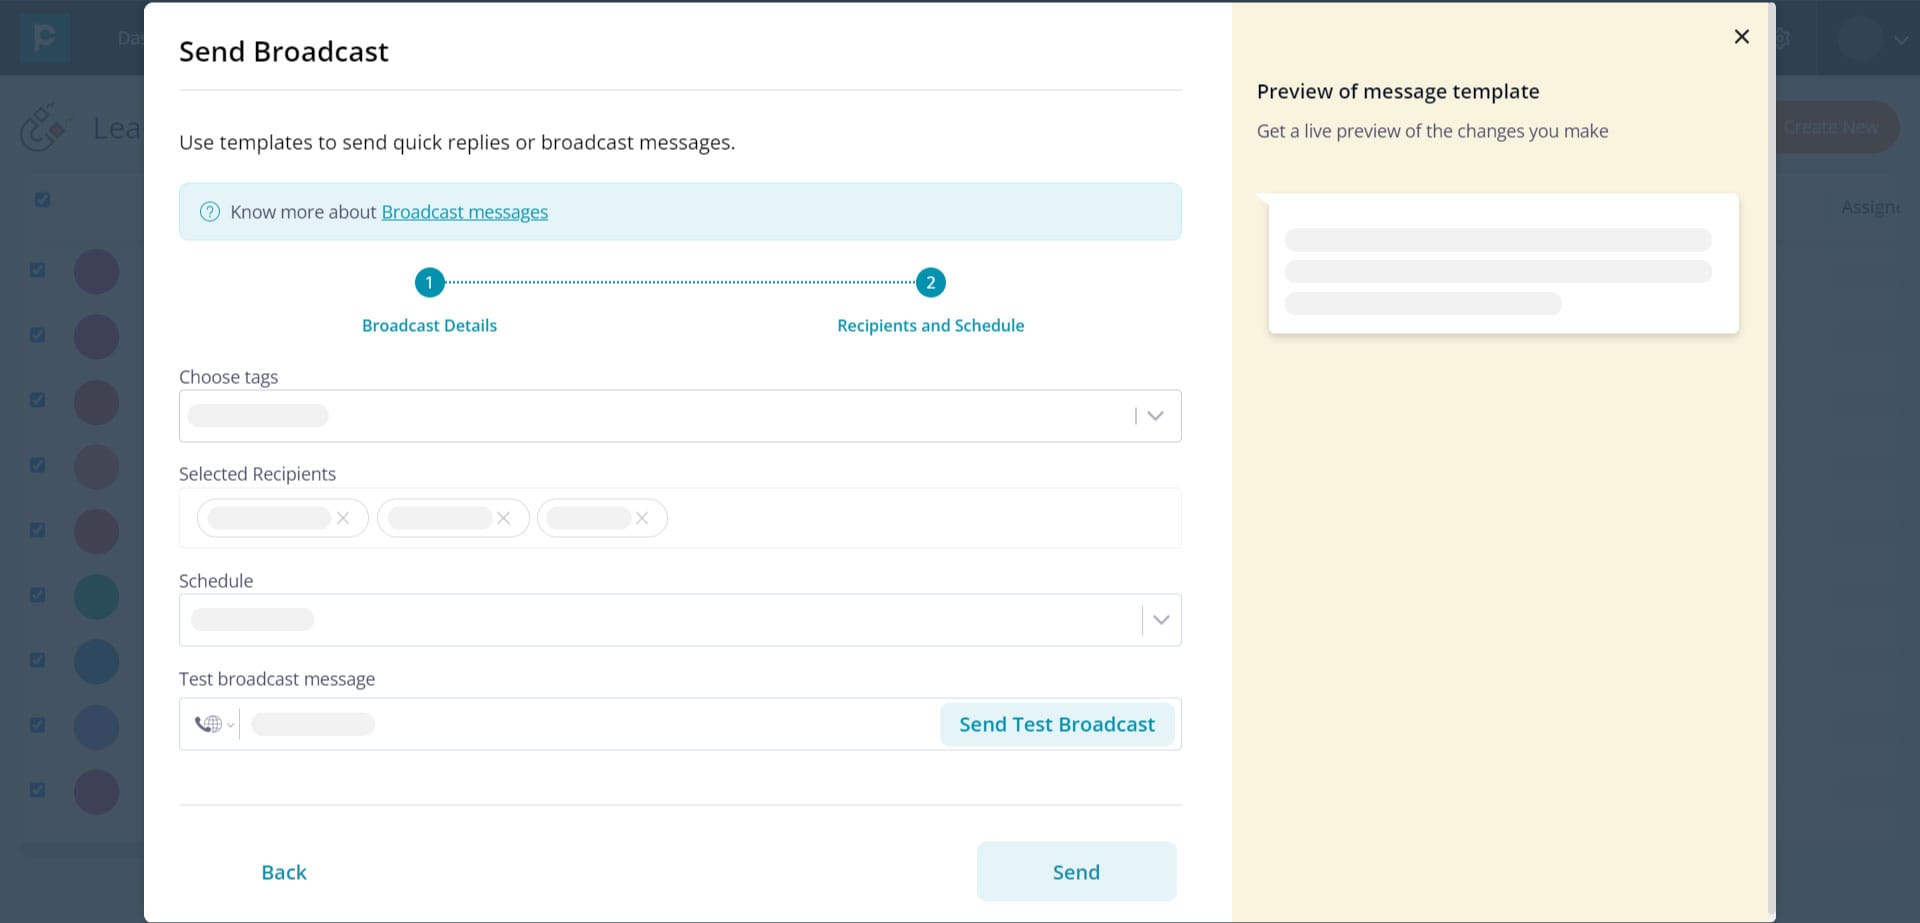
5. In the next screen, fill in the recipient's details and proceed to schedule the broadcast or send it right away.
6. You can review the status of your broadcast message in the bulk action section. For this, navigate to “Logs” by clicking “Broadcast” from the screen's header.
On the screen, you can see the created/sent and scheduled broadcast.
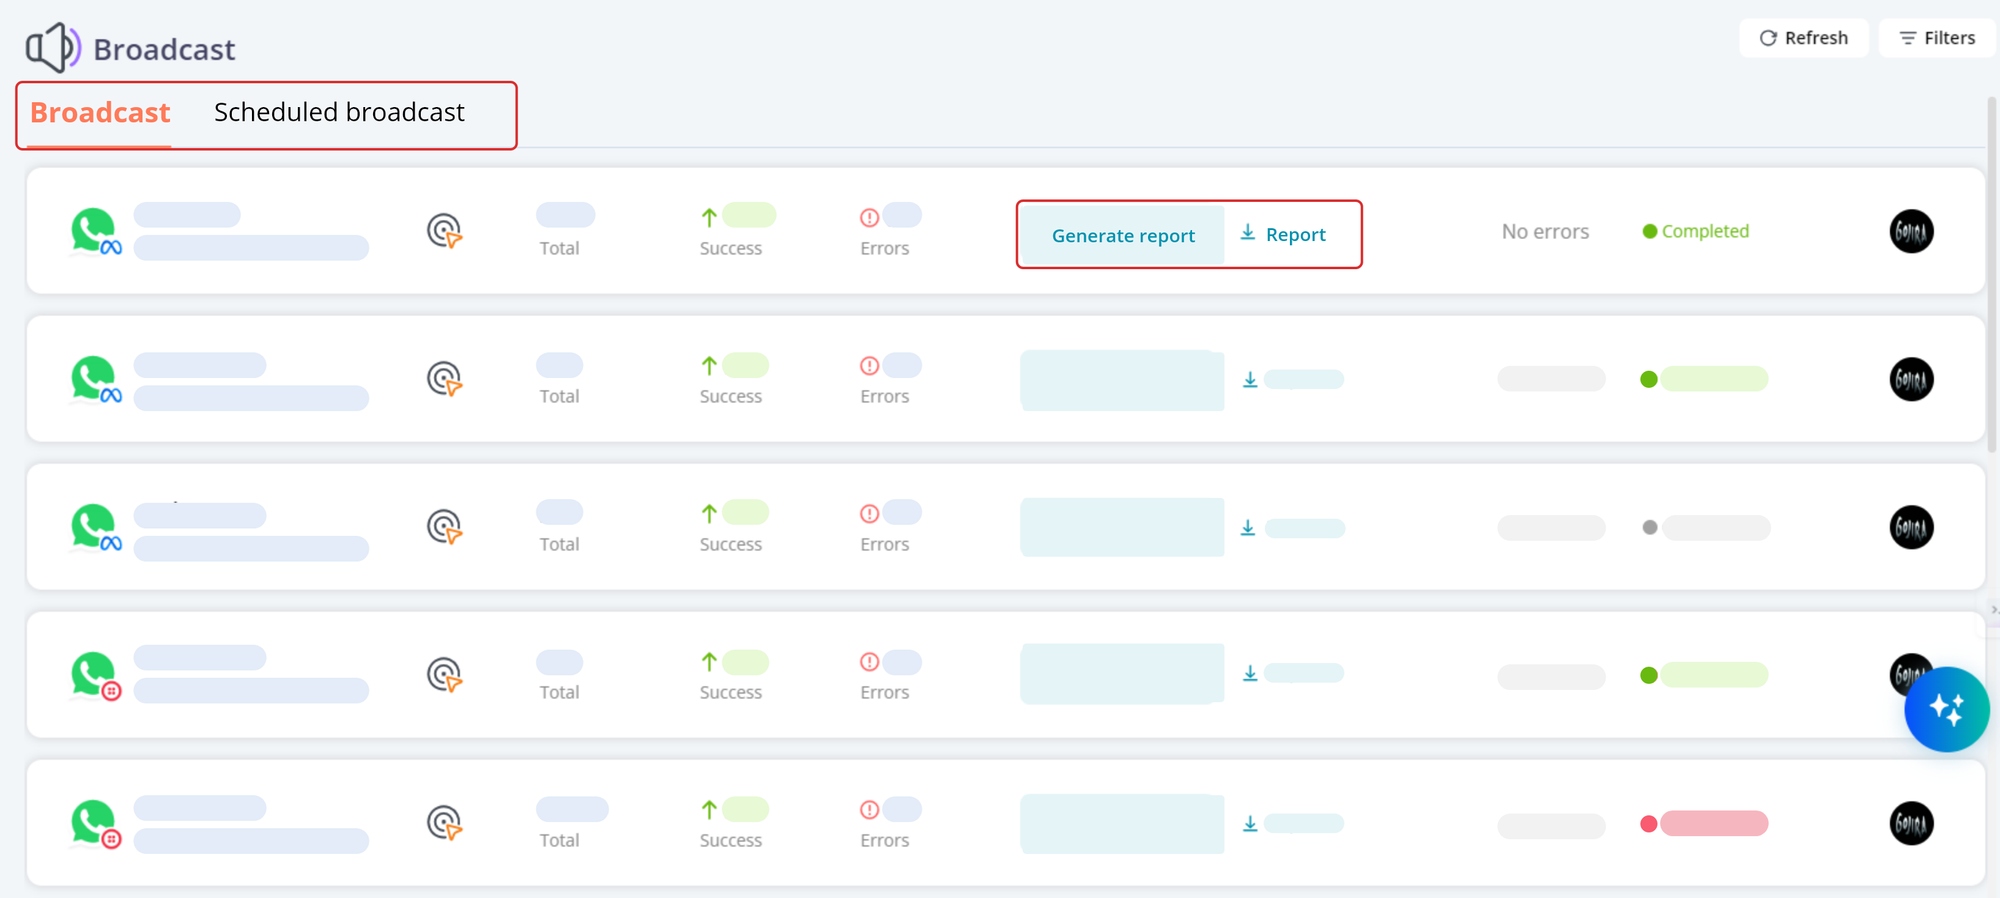
You can also view the real time status report of the broadcast by clicking on “Generate report” and downloading the report.
Converting visitors into Leads/Contacts
1. The panel on the right side of the message module provides you with contact information.
2. Upon confirming the changes (by clicking the tick mark) the changes are saved.
3. This information can further be used to create a lead/contact by using the action button.
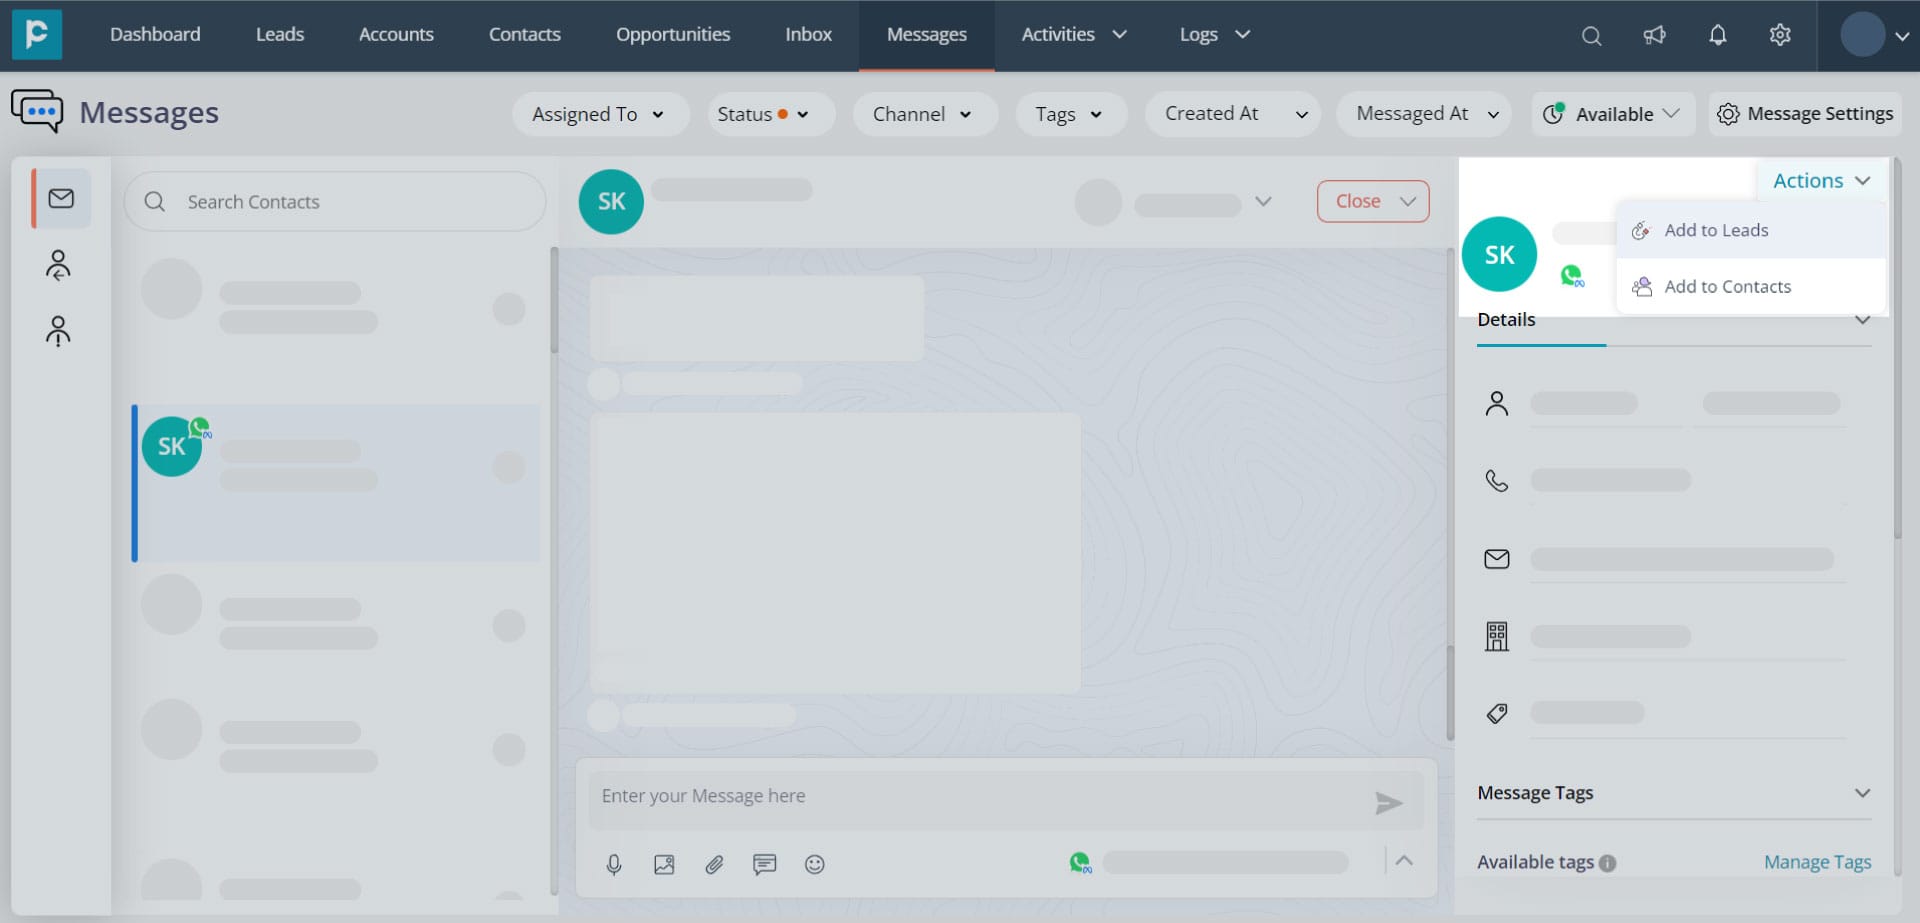
4. Following validations, the record is added to the lead/contact list.
Note: While converting profiles into leads/contacts from WhatsApp/Facebook/Instagram, the name and the email ID will be auto-populated. However, when you are converting profiles into leads/contacts from the Telegram channel, only the name of the profile will be populated. Other contact details need to be filled in manually.
Editing Contacts/Leads information
1. Your team member can edit the information received in the right-hand panel by clicking on “View Lead Details”
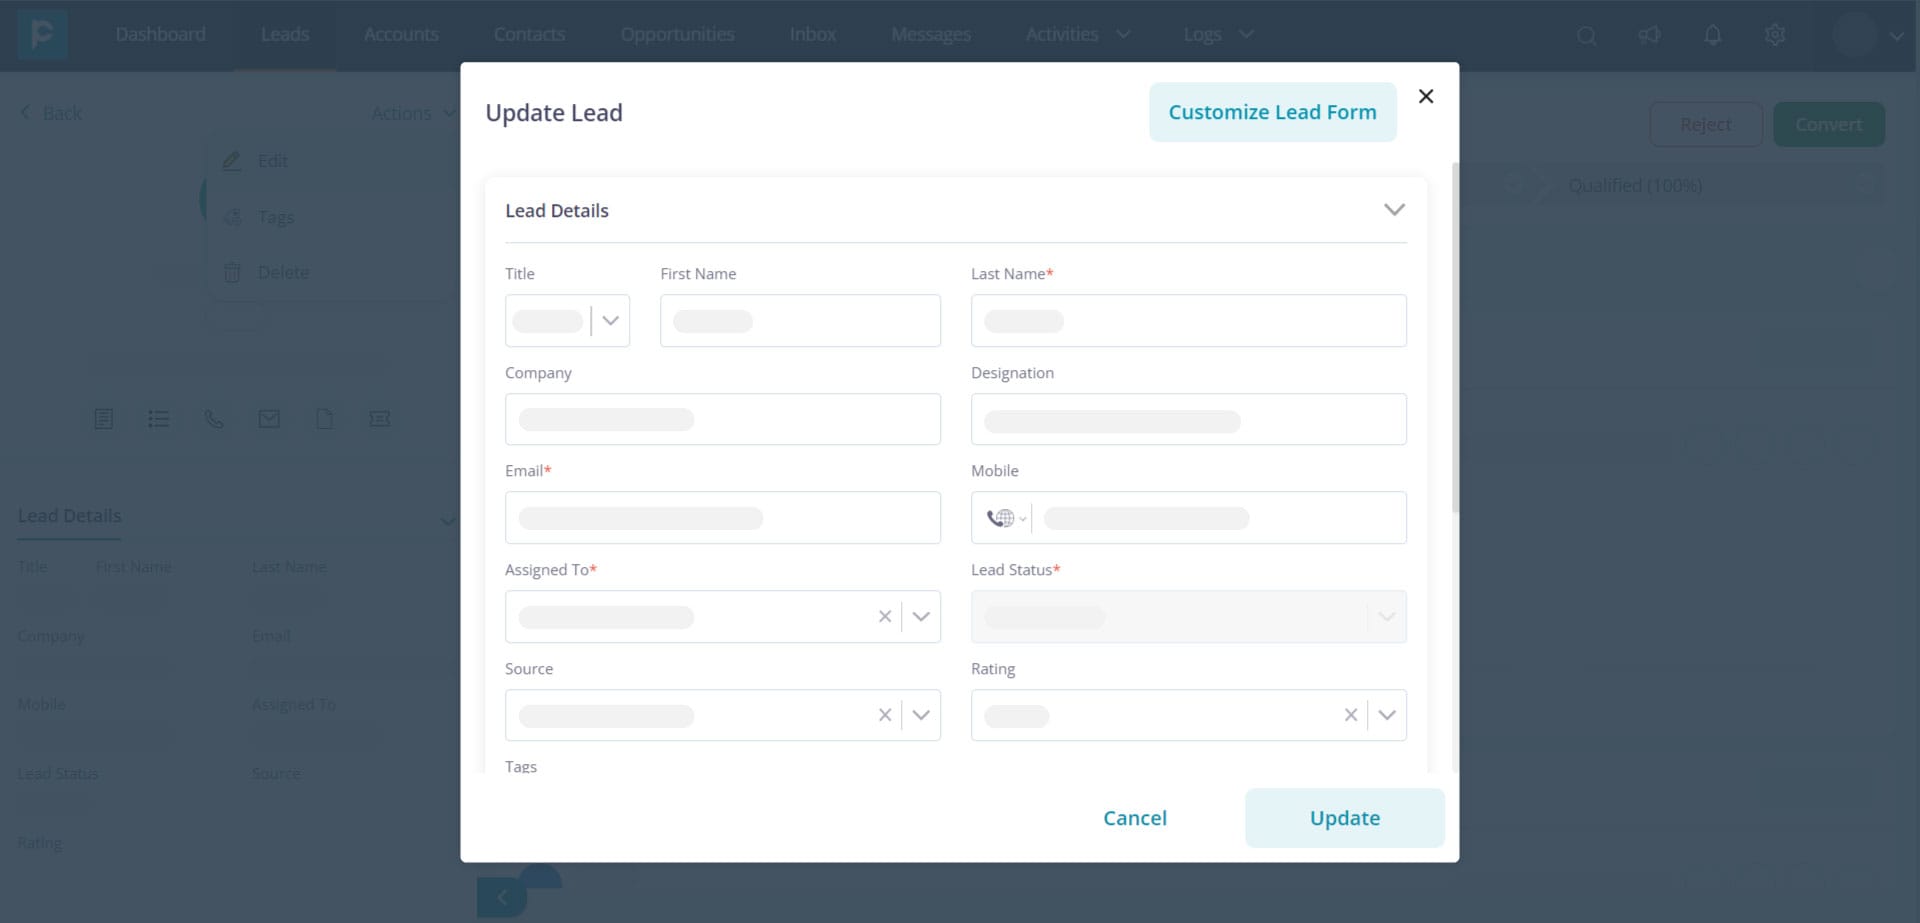
2. Click on “Actions” and “Edit” to edit the information.
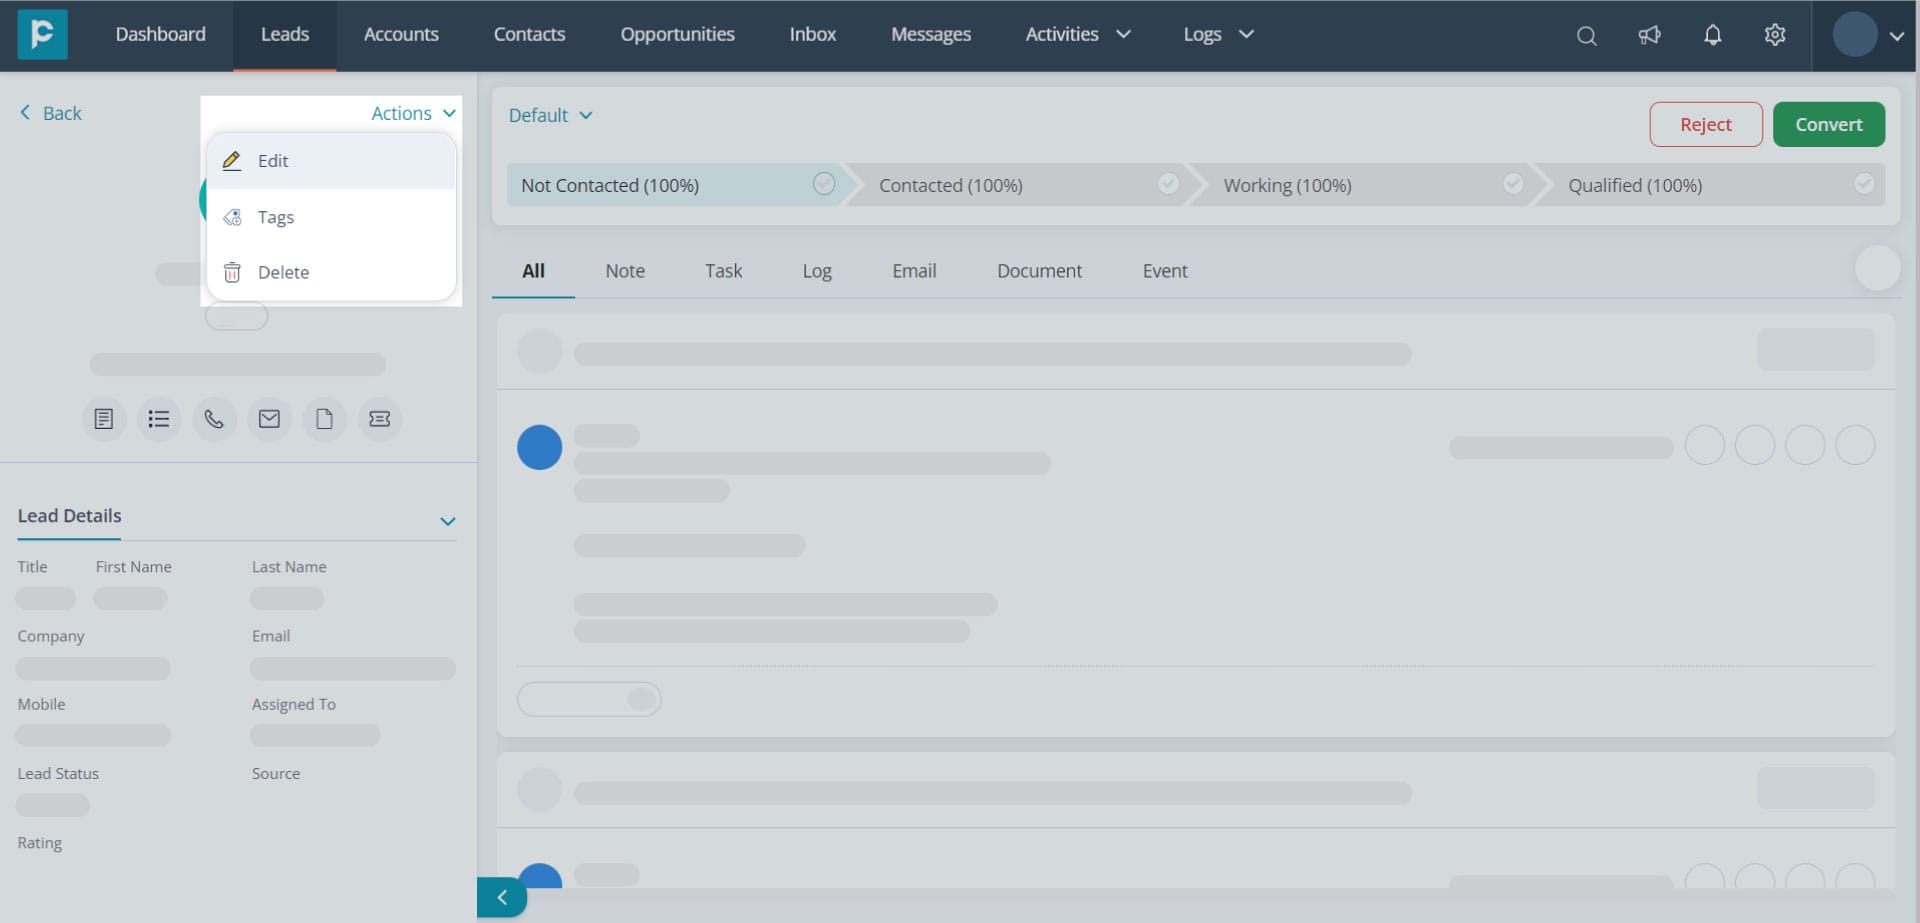
3. Edit the information in the opened-up modal and click “Update” to save the information in your CRM.
Filters
You can search and filter out conversations in the system with the help of the filters.
Here are a few points to remember:
- You can filter the messages based on “Assigned to”, “Status”, “Channel”, “Tags”, “Created At”, or by “Messaged At” date.
- In the “Assigned to me” tab, you can only filter messages that are assigned to you.
- When you pick "All" in the "Assigned To" filter, you can see both assigned and unassigned messages.
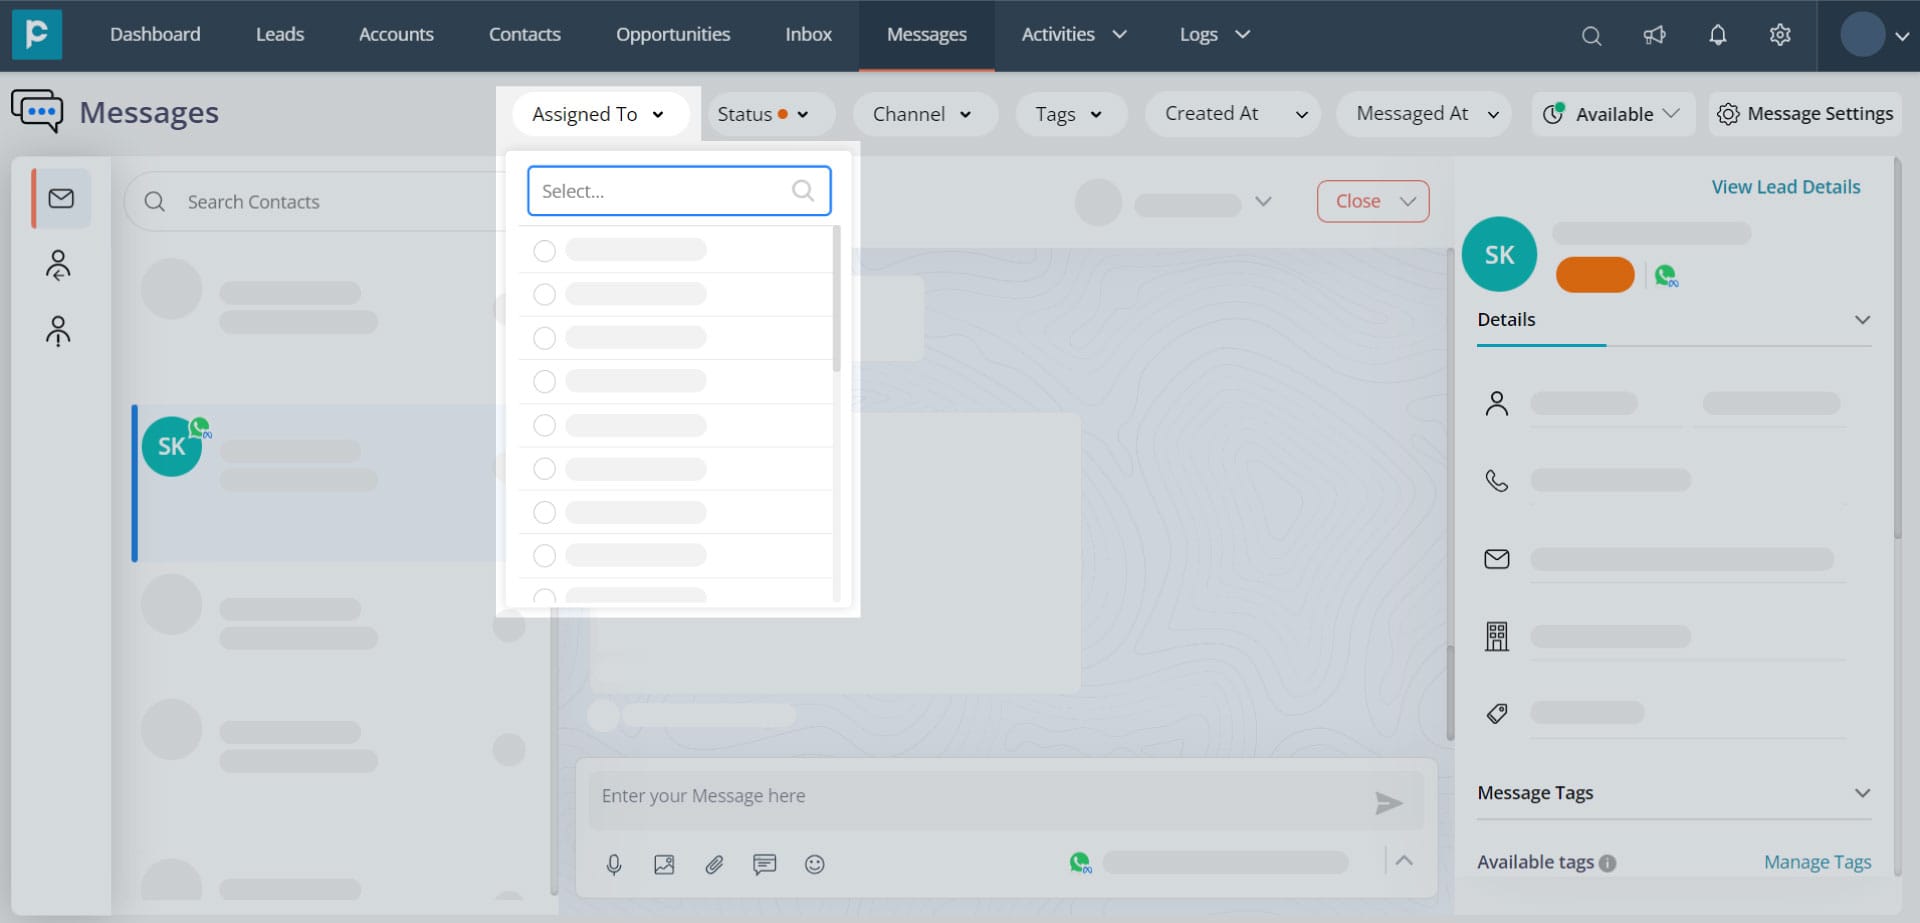
- You have to navigate to the filters in “All Conversations” to have access to all the conversations.
Status and assignment of conversations
- Open status of the conversation: The conversation status is “Open” when a message is received from the potential customer or a template message is sent to the lead.
- Assign the conversation: The messages can be assigned to any team member by clicking the name drop-down. After the message has been assigned, the message will no longer be available in the “Unassigned” and will have to be filtered out. If the message has been assigned to you, it will be available in the “Assigned to me” section.
- Close the conversation: You can close the conversation. A closing note can be added to the conversation for the next user’s reference or as a reminder to oneself as to why the conversation was closed.
Closed conversations are moved to “Unassigned”. They will have to be filtered or searched if you want to find them again.
Merge conversation
If the contact sends the message through different channels, they can be merged into one conversation. This makes it easier for the salespeople to track the previous conversation comprehensively. Read our guide to know more about the benefits and how to merge contacts.
Away status and message
With this feature, you can set up the off hours, change the availability status to “Away” and schedule away messages to be sent out when you are not around.
This feature and the away message can offer:
- Reassurance to the customers that you would respond soon.
- A reason for not being able to respond immediately.
- Estimated response time
Wondering how to set up away message? Read our blog!
Mark the message as read or unread
You can now easily prioritise and organise your conversations. You can indicate which messages need your attention right away and which ones you can read later. With a simple click, you can mark a message as "read" or "unread."
For marking a message as read or unread, click on the downward arrow and click on “Mark as read” or “Mark as unread” based on your requirement.
Bulk read/unread action
Note:
- All the users who have access to the message module and channel can perform the bulk read/unread action.
- You can mark up to 20 conversations as read/unread at once.
To perform this bulk read/unread action, follow the steps:
1. Click on the three dots on the left side of the message listing panel.
2. Click “Select conversations”.
3. Choose the conversations you would like to mark as read/unread.
4. Click on the three dots again and click “Mark as read” or “Mark as unread.
Send multiple files in a single message
In the Message module, users are allowed to easily share relevant documents, images, or other files with their customers in a single message. It is especially useful for sales and marketing teams, as it enables them to provide detailed product or service information to prospects and share marketing collateral such as brochures, case studies, and other resources.
In conclusion, integrating channels into your CRM system can significantly improve customer communication and support, with the help of its highly useful features. By consolidating customer interactions across multiple channels into a single platform, you can gain a comprehensive view of your customers, streamline communication, provide more personalised and efficient service, and drive business growth.
Have trouble with integrating Channels? Talk to our friendly representatives!